How to Trade Crypto and Withdraw on LBank
How to Trade Cryptocurrency on LBank
How to Trade Spot on LBank website
A spot trade is a simple transaction between a buyer and a seller to trade at the current market rate, known as the spot price. The trade takes place immediately when the order is fulfilled.
Users can prepare spot trades in advance to trigger when a specific spot price is reached, known as a limit order. You can make spot trades on Binance through our trading page interface.
(Note: Please make sure you have deposited to your account or have an available balance before making a spot trade ).
Making a spot trade on the LBank Website
1. Go to the LBank website and select [Log in] from the top-right menu.
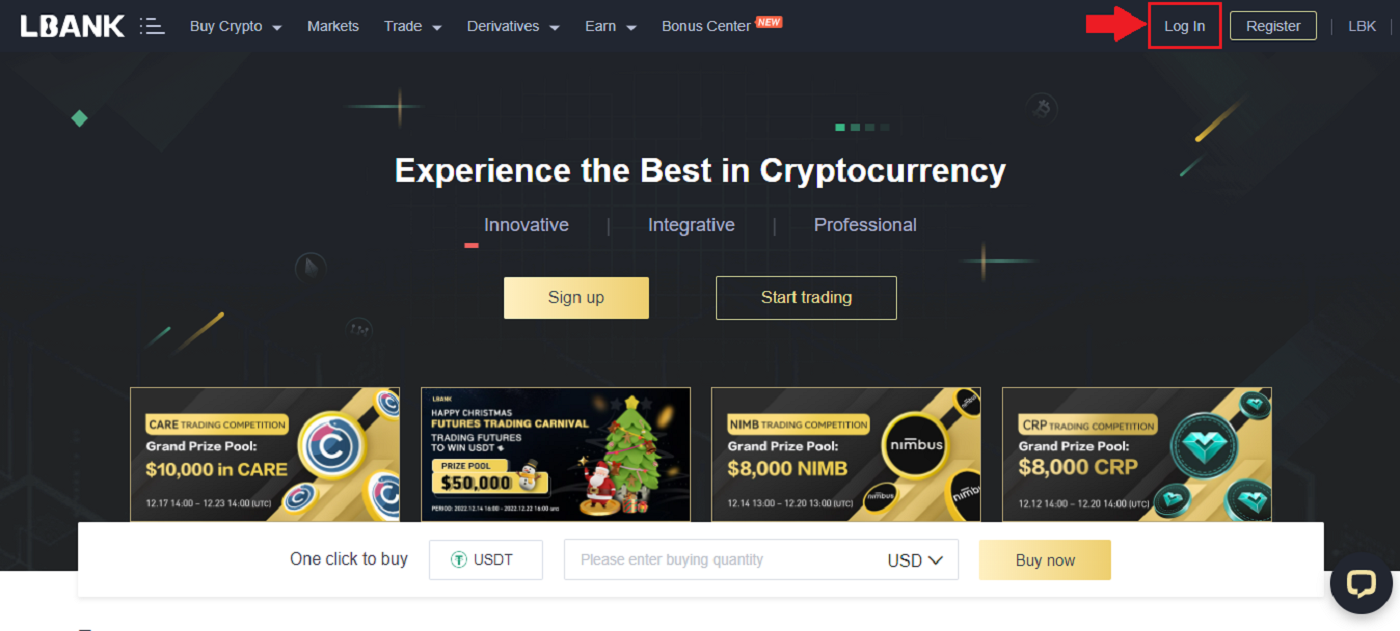
2. On the homepage, select [Trade] and click on the first option.
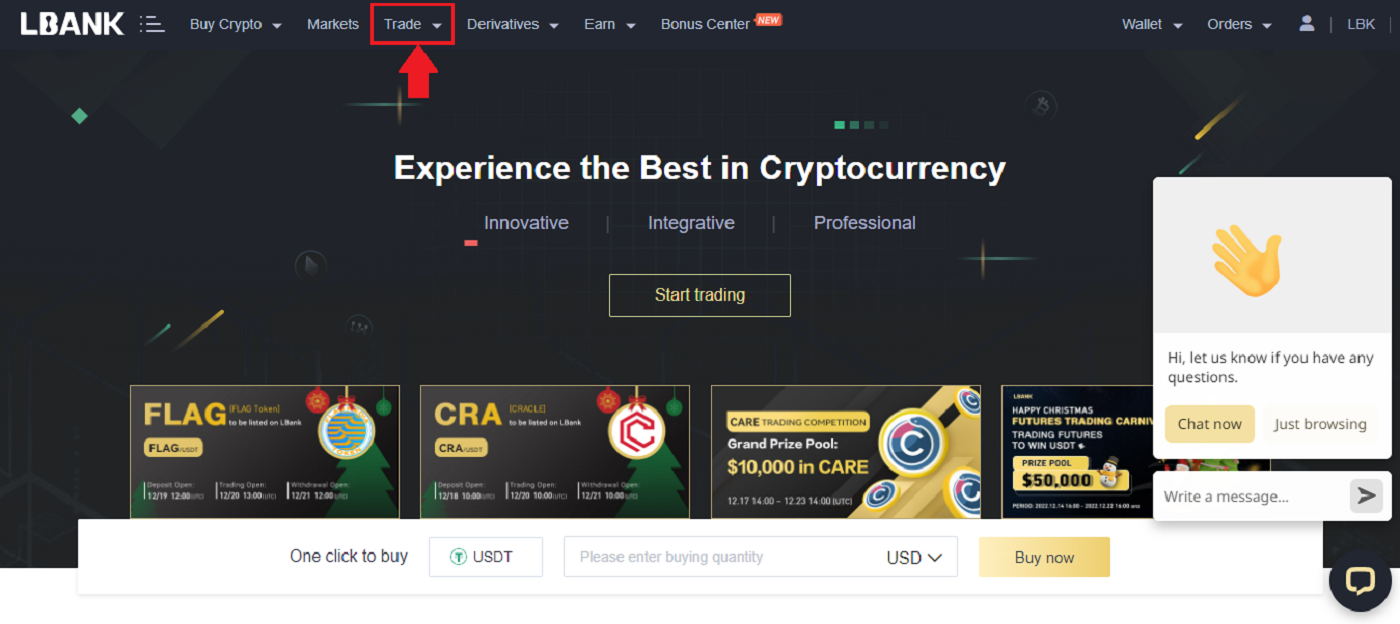
3. When you click Trade, a new page appears as shown in the image below. Now you need to click [Spot] in the dropdown to set your wallet to [Spot].
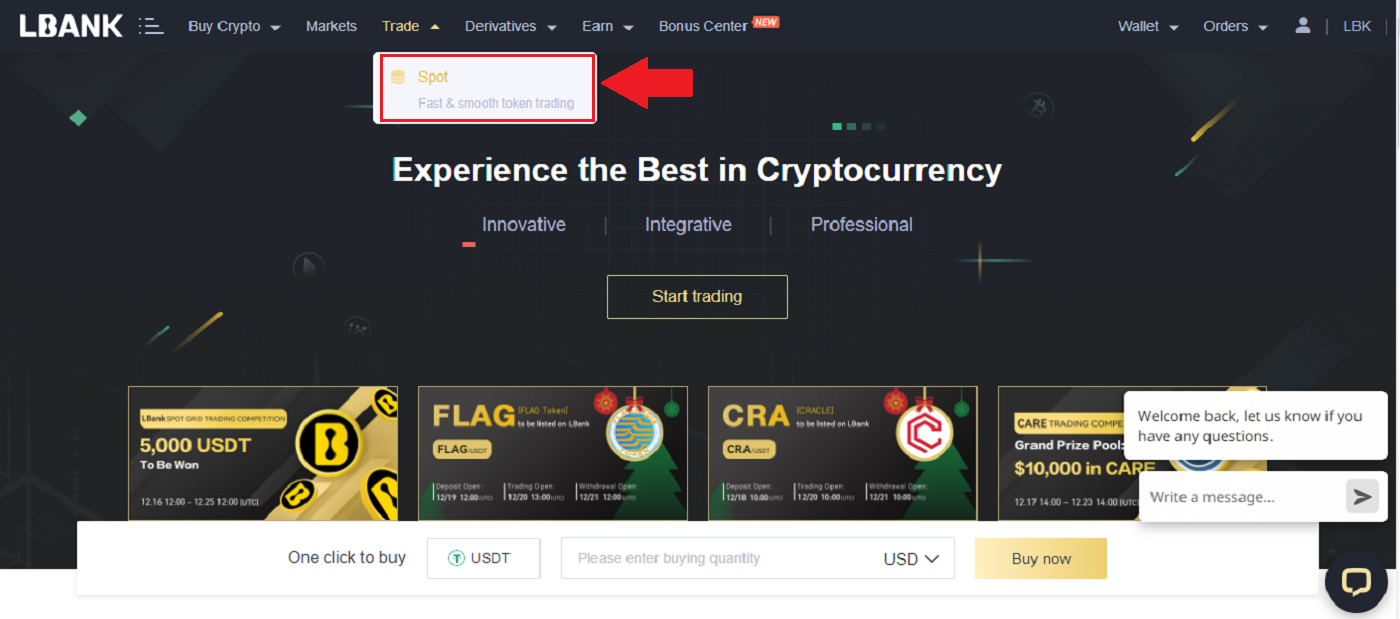
4. After clicking on [Spot] it opens a new page where you can see your Asset and all the Asset available for trading. You can also search for your favorite asset.
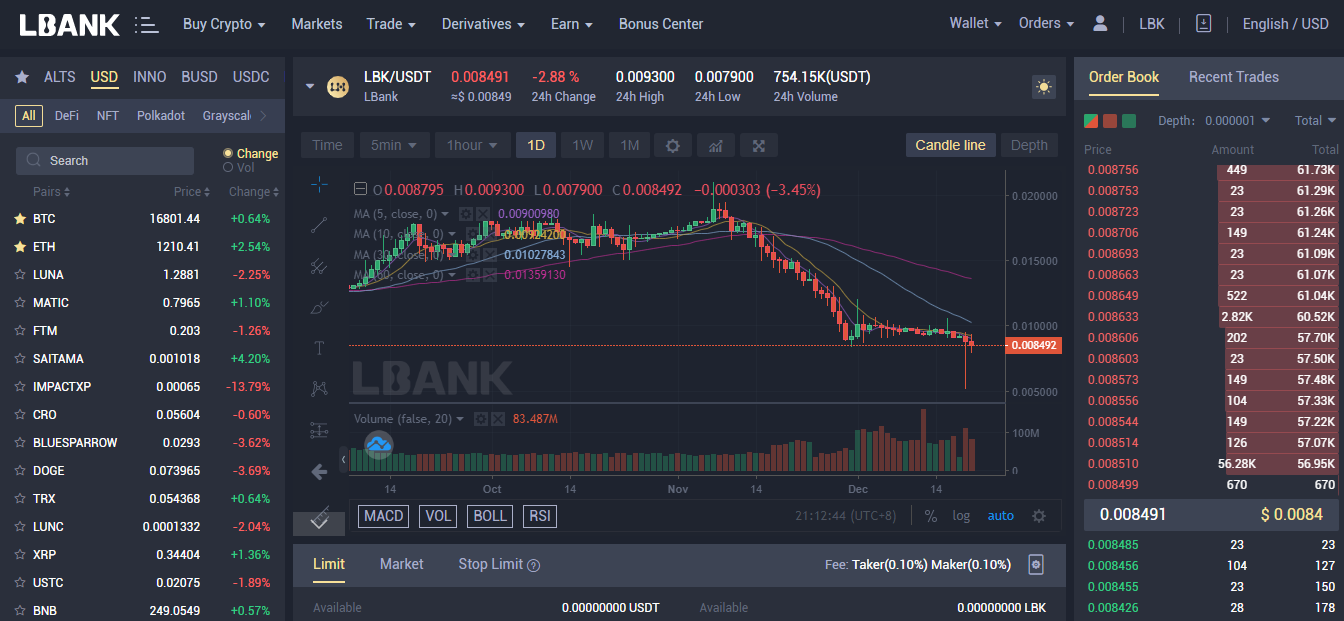
5. Find/Search for the asset you want to trade, place your pointer on [Trade], and then select the pair you want to trade.
For example: In the shot below let’s say Danny wants to trade LBK, after placing the pointer on [Trade] the available pair is LBK/USDT, (click on the pair you want to trade).
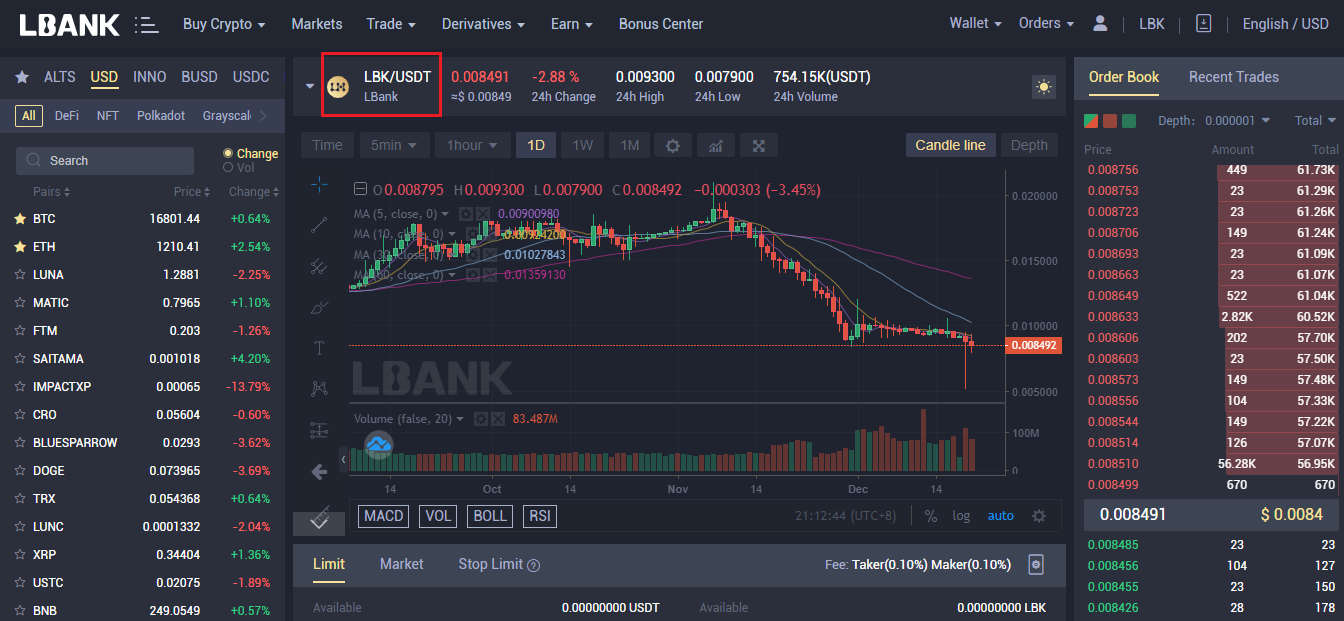
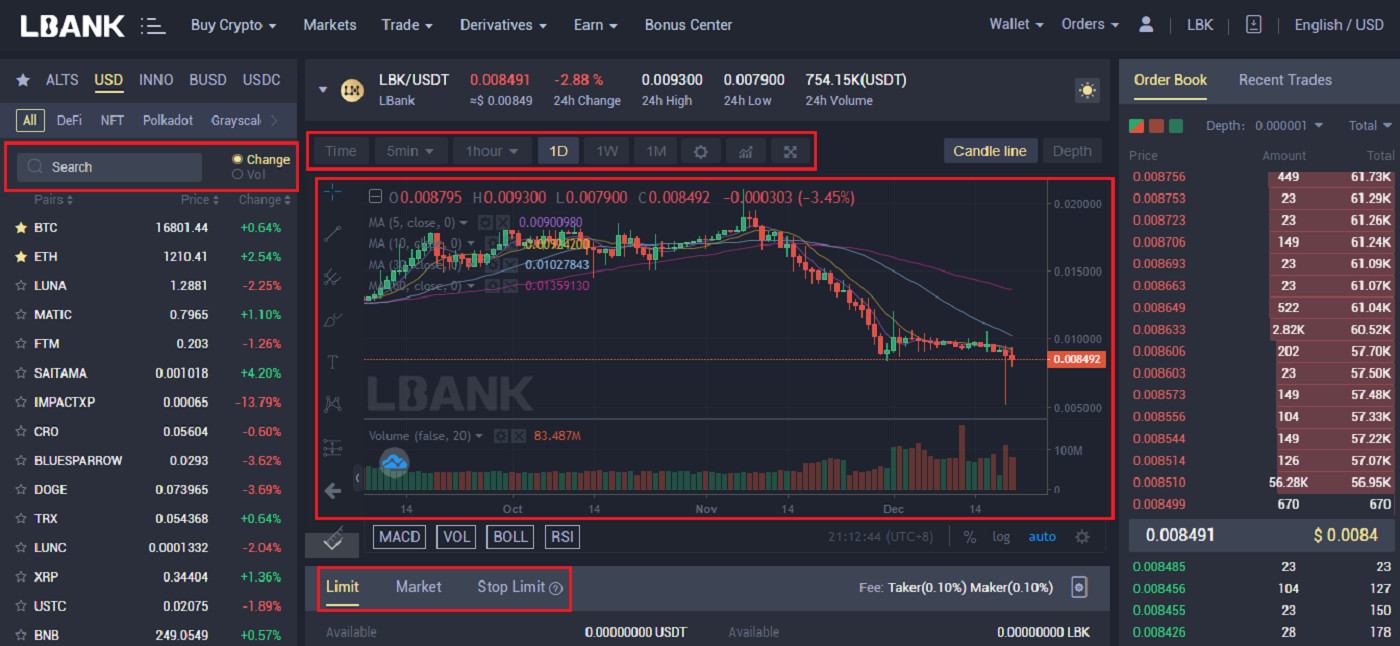
6. As seen in the image, a new page opens. Below, you can choose a different asset, alter the timeframe, view charts, conduct your own research, and also place trades.
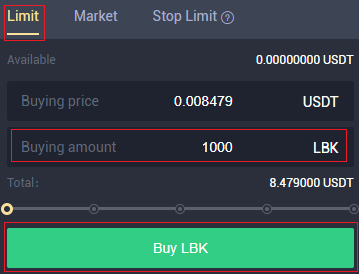
7. Placing your Order: Limit Order
Let’s say Danny wants to buy 1000 LBK at a lower price than the current price. Click on the [Limit] tab set the price and amount as shown in the shot below, then click on [Buy LBK].
You can also use the Percentage bar to place orders based on the percentage of your balance.
8. After clicking on [Buy LBK] an Order confirmation will see on the screen for you to cross-check and confirm if you wish to go ahead. Click [Confirm]
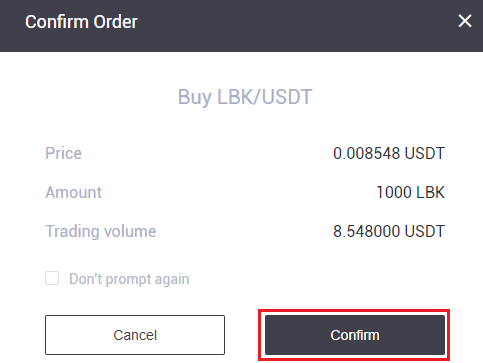
9. After confirming the Order, the Order will be seen on the Open order tab below. And if you wish to cancel the Order, there is also an option for that.

10. Placing your Order: Market Order
Let’s say Danny wants to buy 5 USDT worth of LBK at the current price. Click on the [Market] tab, input the amount you want to buy in USDT, then click on [Buy LBK].
You can also use the Percentage bar to place orders based on the percentage of your balance.
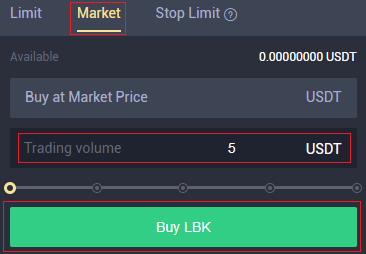
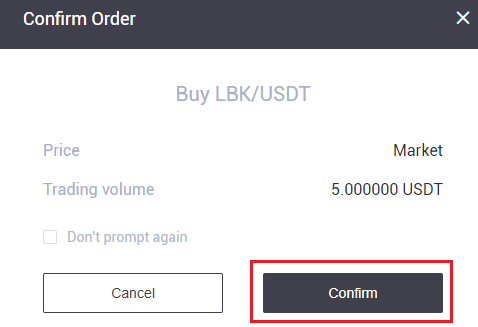
11. After clicking on [Buy LBK] an Order confirmation will see on the screen for you to cross-check and confirm if you wish to go ahead. Click [Confirm].
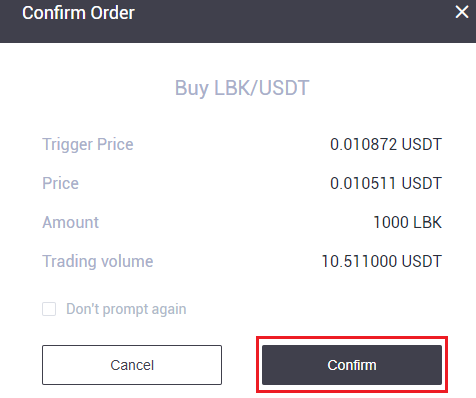
12. Let’s say Danny wants to buy 1000 LBK at a particular price and if LBK falls lower than what Danny wants, Danny wants the trade to close automatically. Danny will specify three parameters; the trigger price (0.010872), the stop price (0.010511), and the amount (1000) He wants to buy. Then click [Buy LBK]
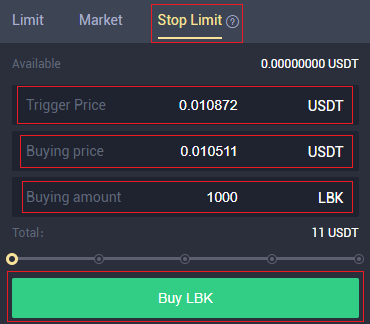
13. Click on [Confirm] to go ahead with the purchase.
14. Click on the Order History tab to see your Orders.

15. Click on the Transaction History tab to see all the transactions you have made.

How to Trade Spot on LBank application
A spot trade is a simple transaction in which a buyer and seller exchange at the current market rate, often known as the spot price. When the order is fulfilled, the exchange occurs immediately.Users can plan ahead of time spot trades that will execute when a specified spot price is reached, known as a limit order. On the LBank App, you can perform spot trades with LBank.
(Note: Before making a spot transaction, please ensure that you have deposited or have an available balance in your account.)
Step 1: Log in to your LBank account and go to the spot trading page by clicking [Trade].
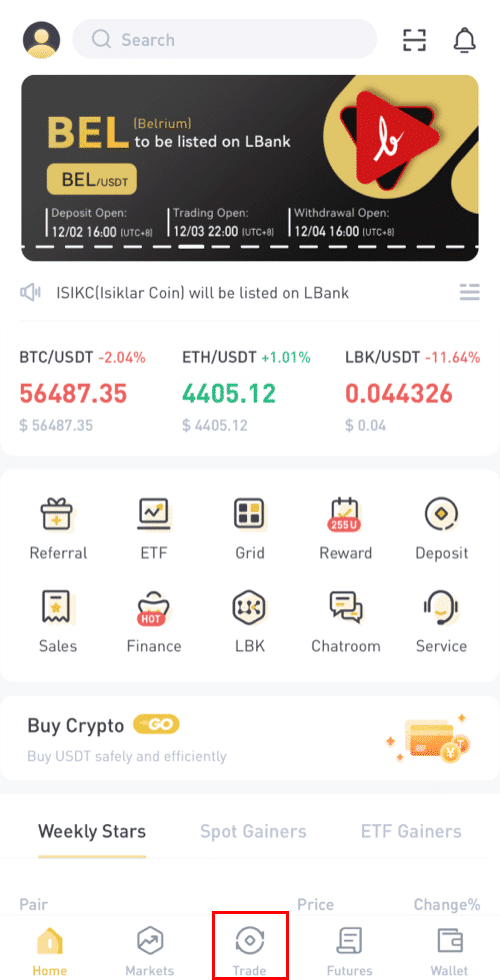
You will now be on the trading page interface.
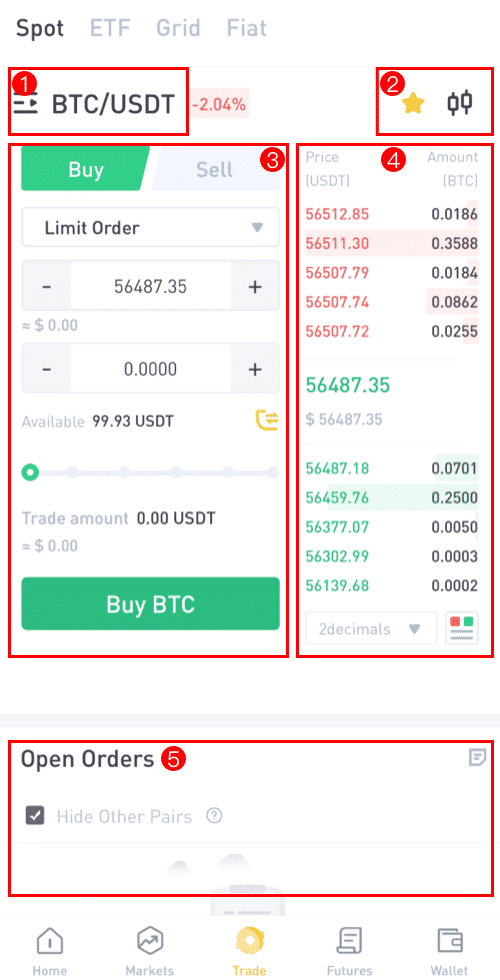
(1). Market and Trading pairs
(2). Real-time market candlestick chart supported cryptocurrency trading pairs
(3). Sell/Buy order book
(4). Buy/Sell Cryptocurrency
(5). Open orders
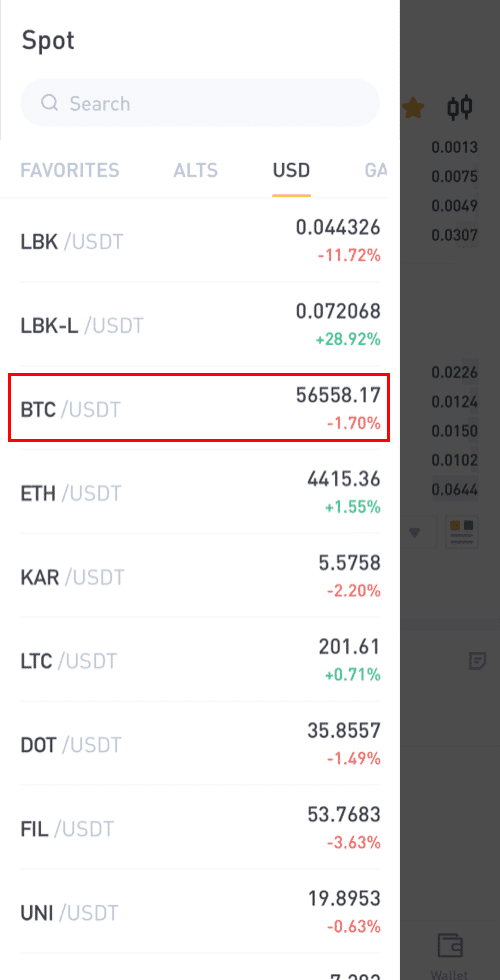
Step 2: You must first decide which pair you want to trade. Select the [BTC/USDT] pair to trade by clicking on it.
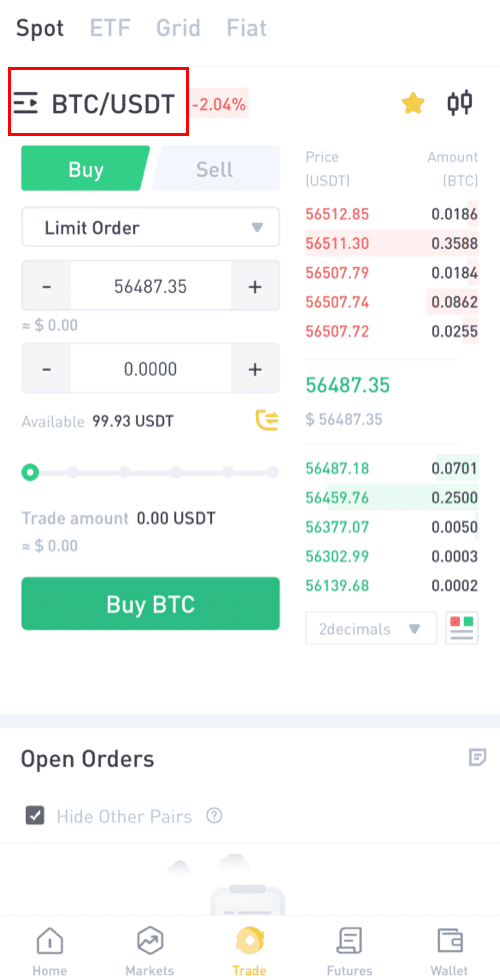
You can choose your partner from a variety of assets (ALTS, USD, GAMEFI, ETF, BTC, ETH).
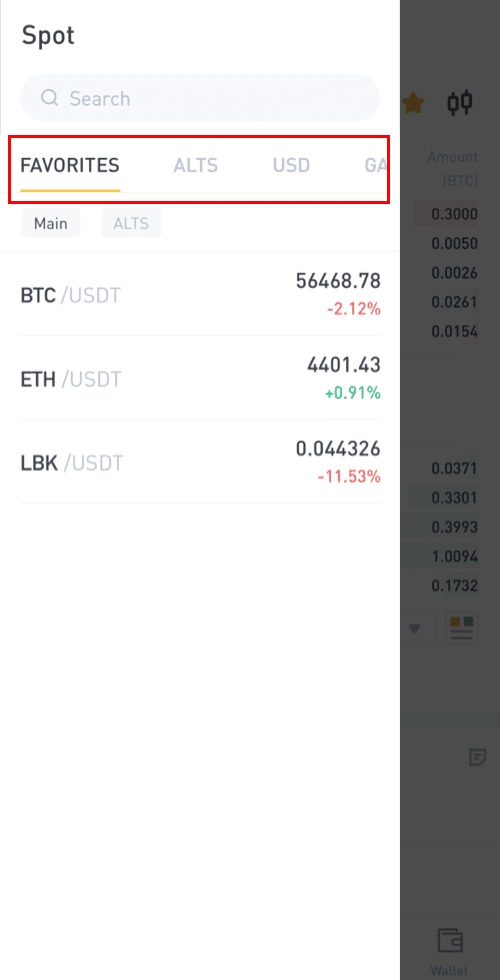
Step 3: Let’s say Danny wants to buy 90 USDT worth of BTC, He will click on [BTC/USDT] trading pair, and this will take him to a new page where he can place the orders.
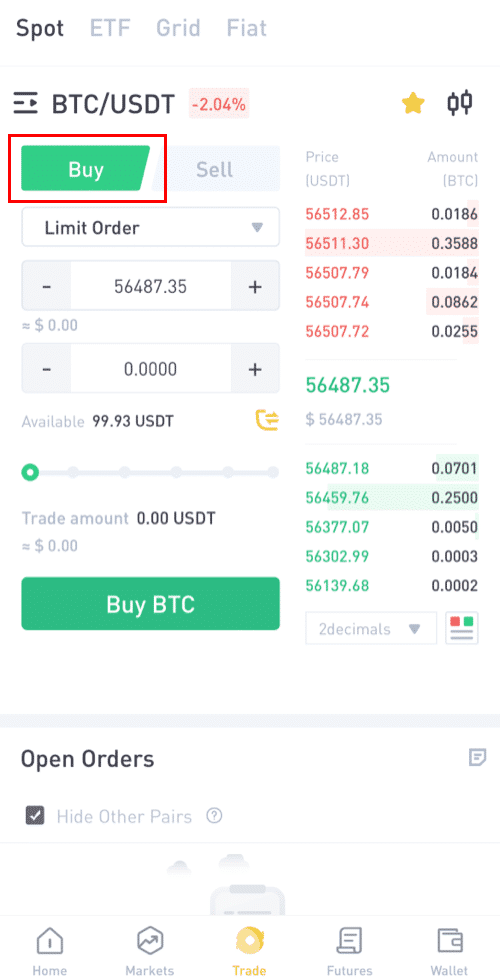
Step 4: For Placing Order: Since Danny is buying, he will click on [Buy], then start placing his order.
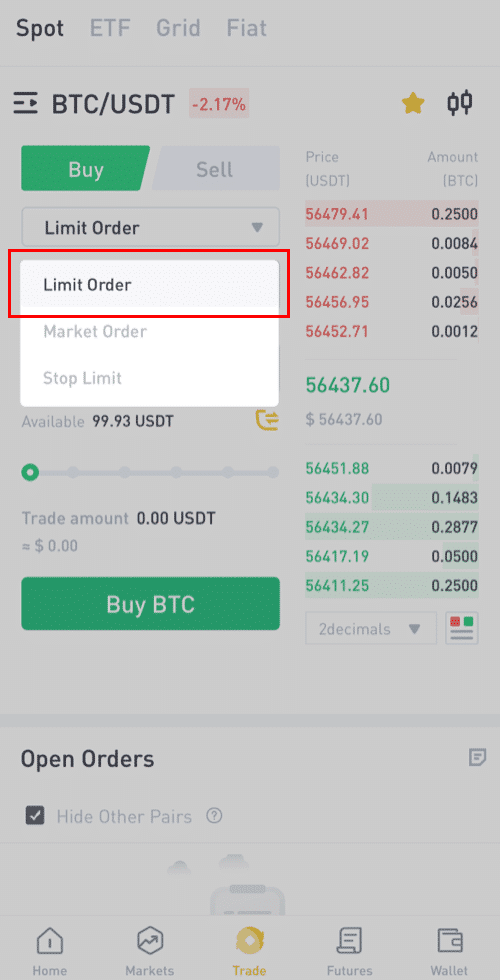
Step 5: Select your preferred trading option by clicking on the limit order option.
Step 6:
Limit Order: A limit order is an instruction to wait until the price hits a price limit before being executed.
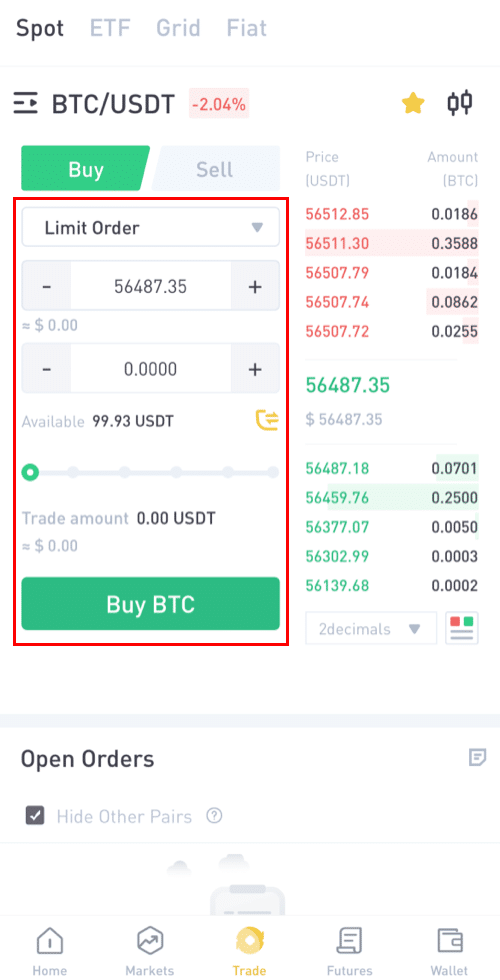
If you select [Limit Order], input the limit price you would like to buy at and the quantity of BTC you will like to purchase. Take Danny as an example, he wanna buy 90 USDT worth of BTC.
Or you can also choose the buying amount by pulling the Percentage bar.
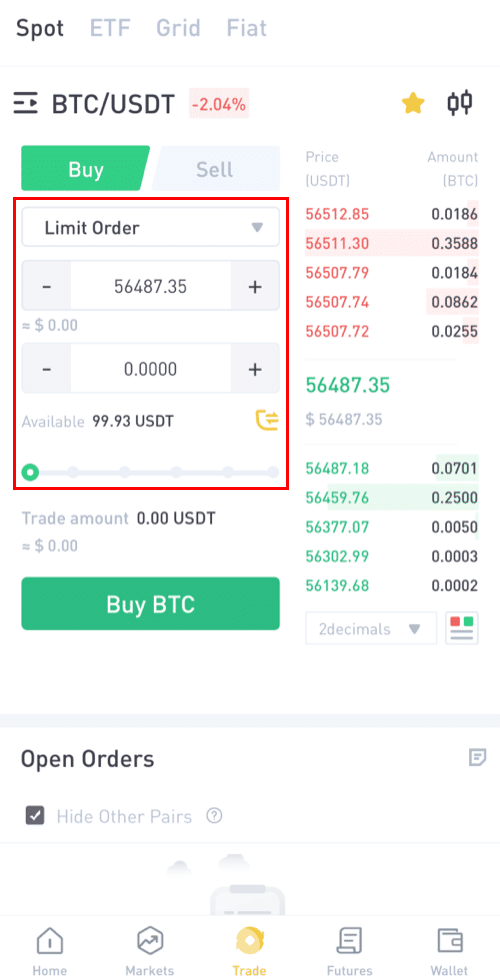
Note: Please ensure you have enough balance in your wallet to purchase.
Step 7:
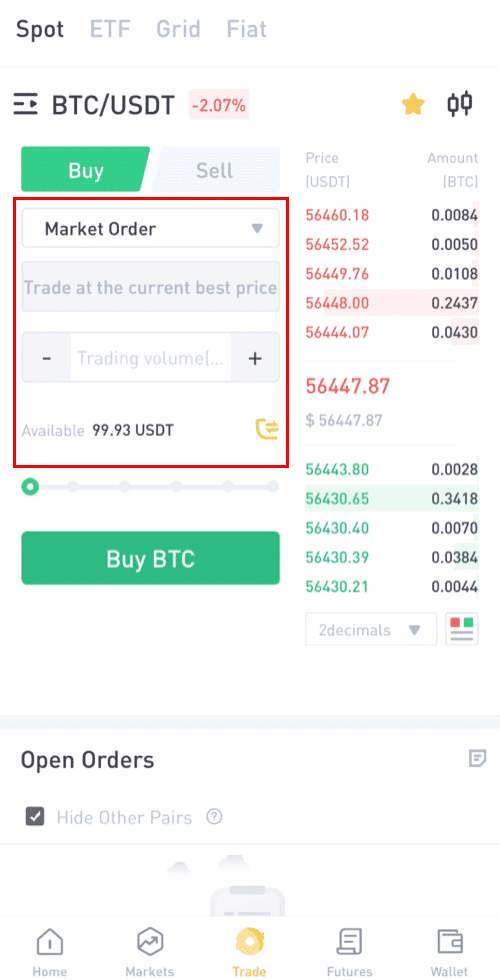
Market order: A market order is an instruction to buy or sell immediately (at the market’s real-time price).
Let’s say Danny wants to buy 90 USDT at the current market price.
Danny will change the Order from [Limit] to [Market Order], then he will input the amount (in USDT) he wants to purchase.
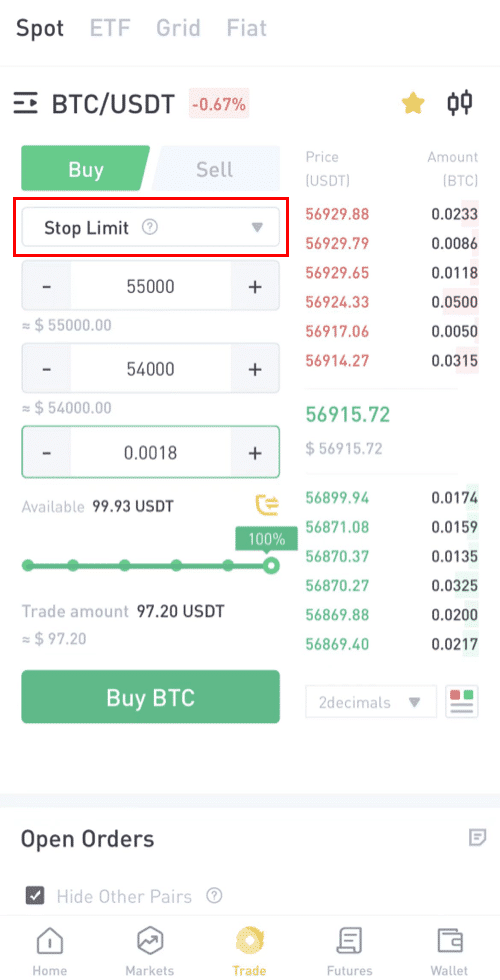
Stop-Limit Order: When the asset’s price reaches the given stop price, the stop-limit order is executed to buy or sell the asset at the given limit price or better.
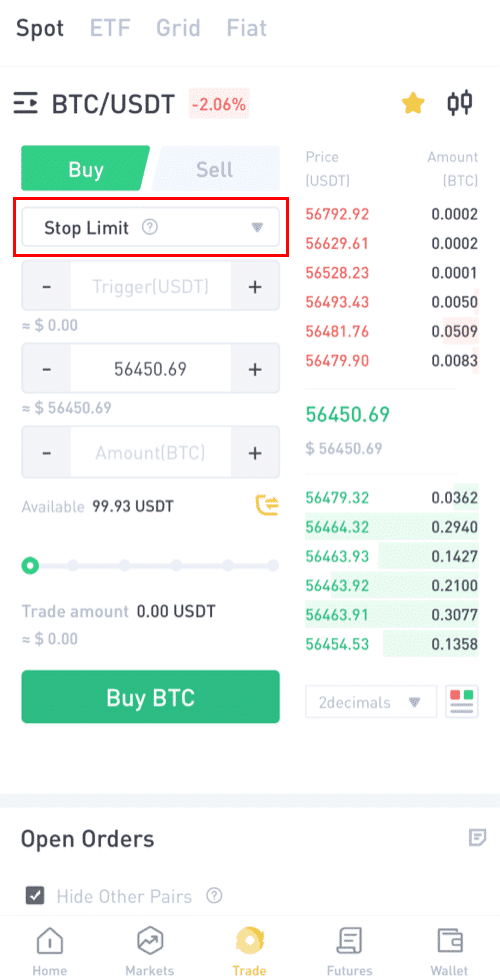
For example, 1BTC= $56450
Let’s say Danny wants to buy BTC worth 90 USDT at a particular price that is lower than the market price, and he wants the trade to close automatically.
In this connection, he will specify three parameters; the trigger price (55000), the stop price (54000), and the amount (0.0018 ~ 97.20 USDT) he wants to buy. Then click [Buy BTC]
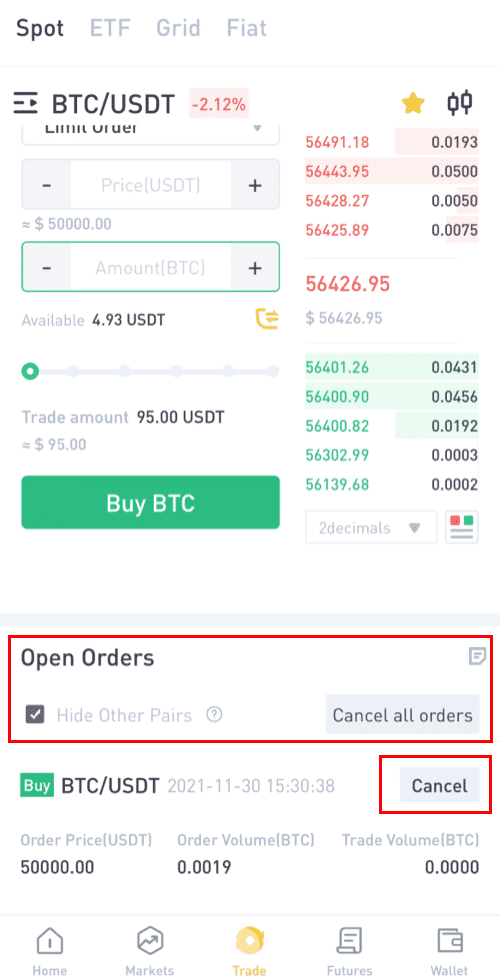
Step 9: Cancel the order.
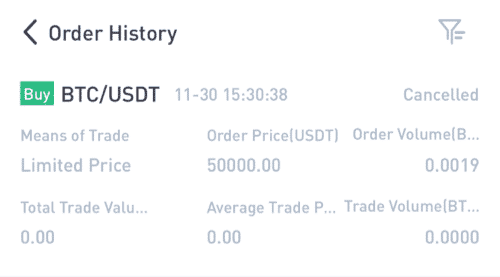
Here you can see your pending Orders and can also cancel those you don’t want, Also order history shows all the Orders.
Step 10: Order history.
You can follow the same steps to sell BTC or any other chosen cryptocurrency by selecting the [Sell] tab.
NOTE:
- The default order type is a limit order. If traders want to place an order as soon as possible, they may switch to [Market] Order. By choosing a market order, users can trade instantly at the current market price.
- If the market price of BTC/USDT is at 66956.39, but you want to buy at a specific price, you can place an [Limit] order. When the market price reaches your set price, your placed order will be executed.
- The percentages shown below in the BTC [Amount] field refer to the percentage amount of your held USDT you wish to trade for BTC. Pull the slider across to change the desired amount.
How to start grid trading on LBank website
What is grid trading?
Grid trading is a trading strategy of selling high and buying low within a set price range to make profits in a volatile market, especially in the cryptocurrency market. The trading bot in grid trading will precisely execute the buying and selling orders within a certain price range set by the traders and save the traders from making unproper investment decisions, missing market information, or worrying about whole-day fluctuations.
Key features:
(1) The program is completely rational with absolutely no panic trading occurring.
(2) Orders will be placed automatically once the grid is set and save the traders from keeping an eye on the chart all time.
(3) The trading bot works 24 hours a day without missing any market information.
(4) User-friendly and easy to get hands-on with without the need to predict the market trend.
(5) Making a stable profit in an oscillating market.
How to use the LBank grid trading strategy?
1 Log in to the LBank website and select "Trading" or "Grid Trading".
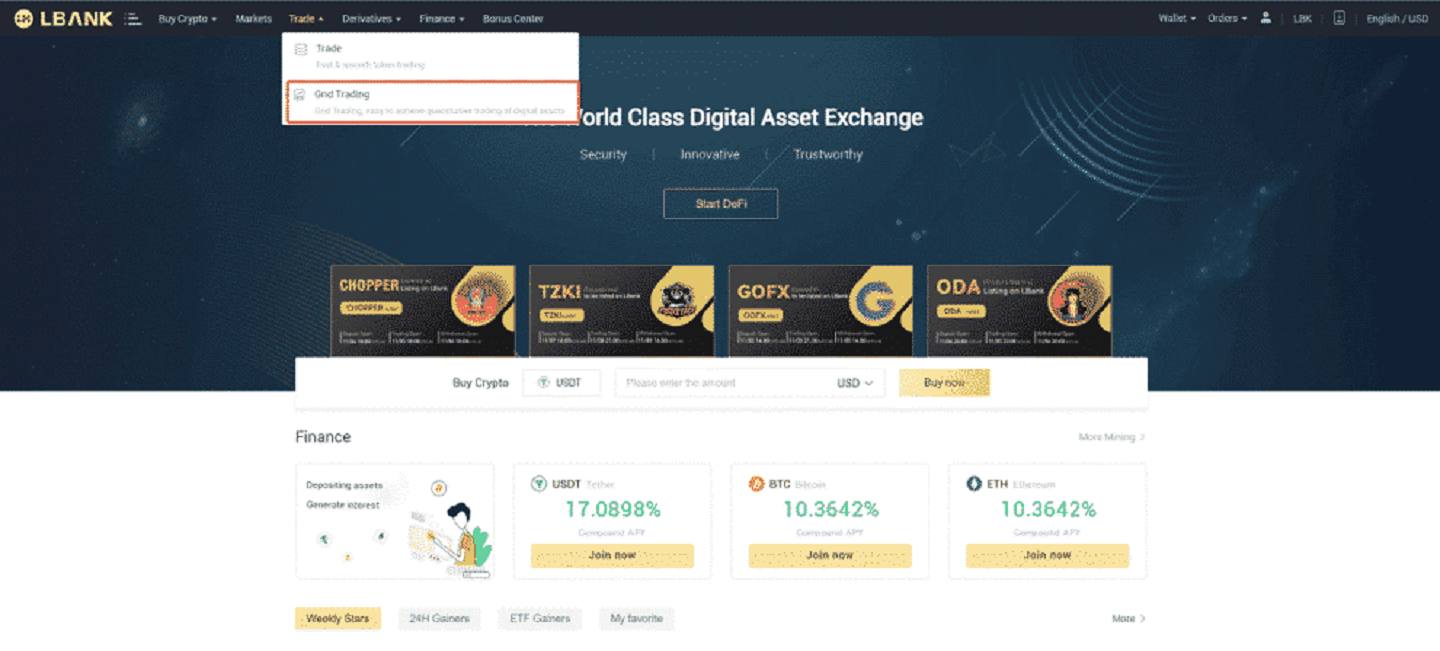
2. Select the grid trading pair (using BTC/USDT as an example).
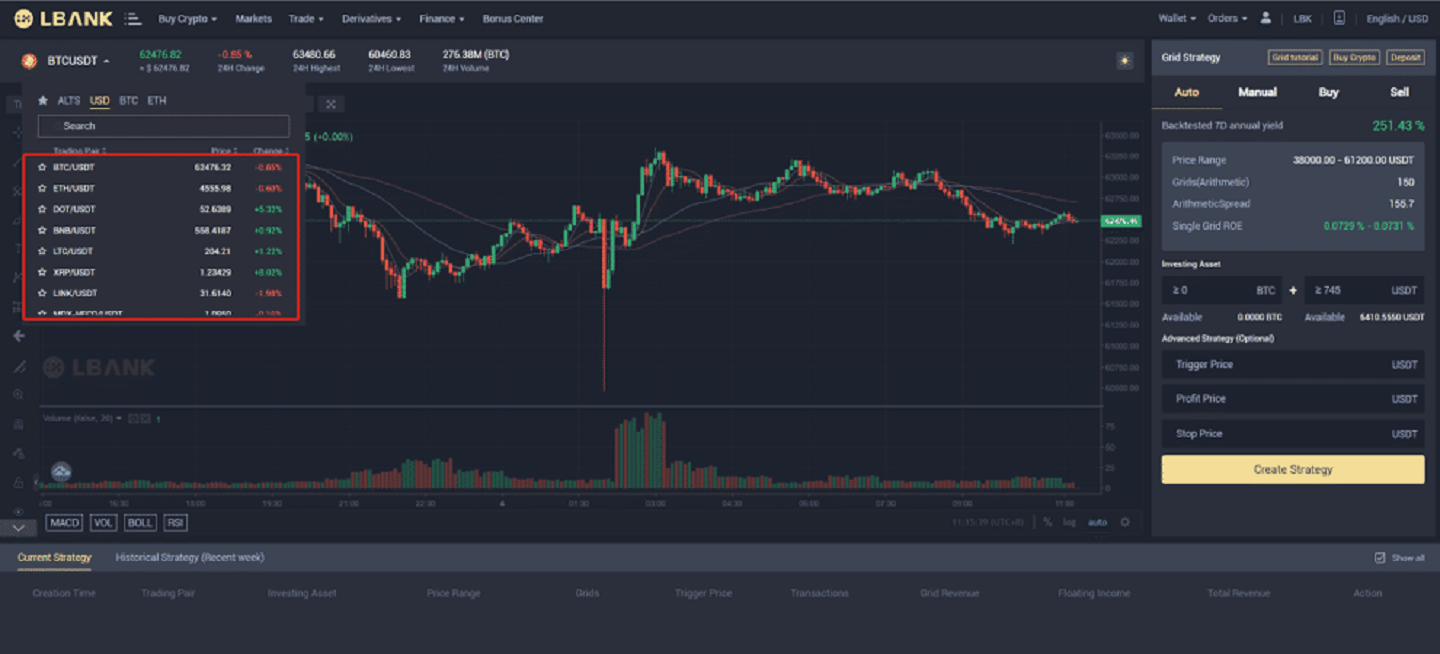
3. Then set your gird trading parameters (Manual) or choose to use the AI strategy (Auto).
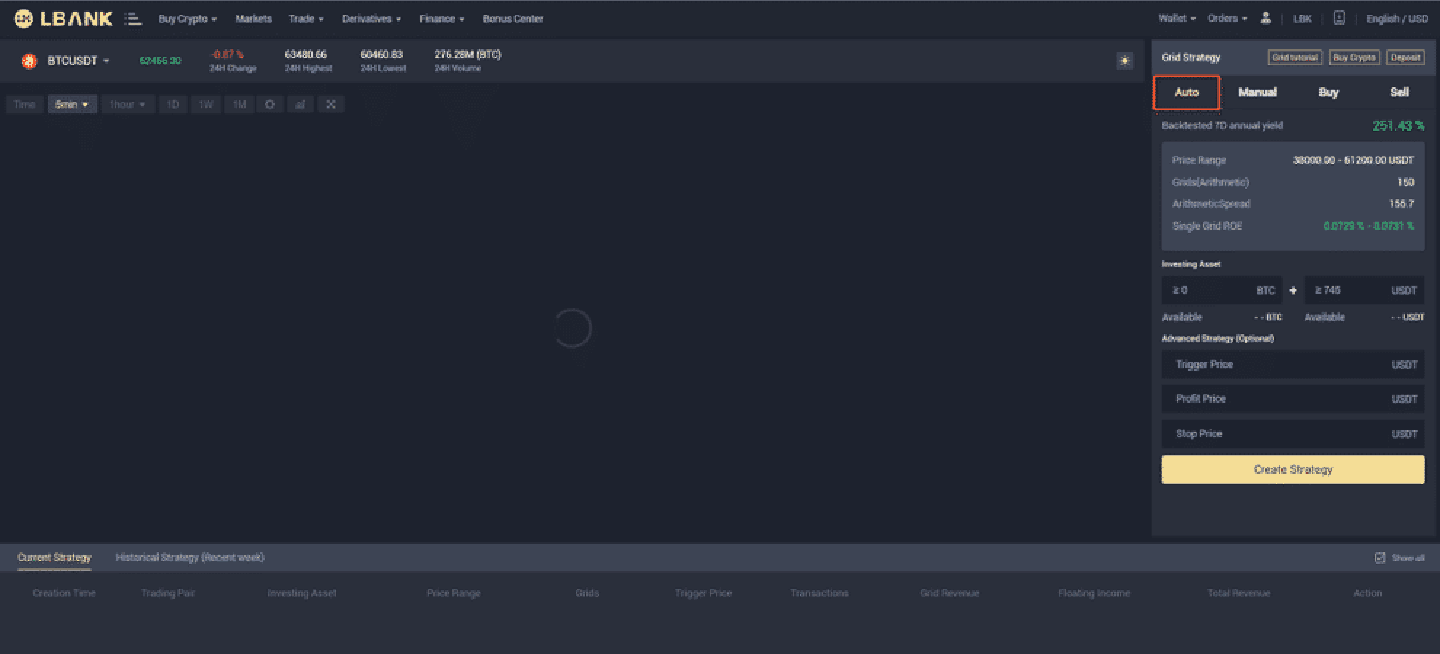
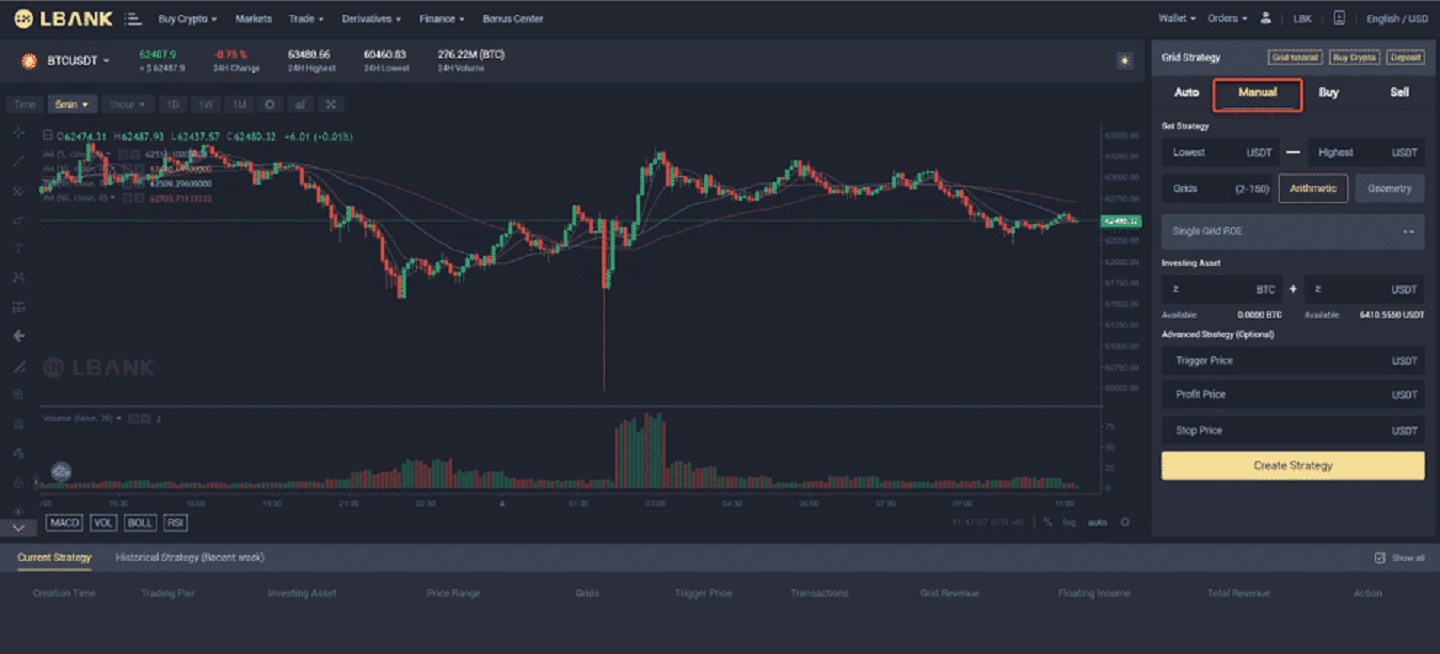
4. Create a grid strategy of your own
(1) Click Create Grid
(2) in the "set strategy" - fill in the "interval lowest price - interval highest price" - set the "grid number" - choose " Arithmetic" or "Geometric"
(3) Then, the "single grid ROE" will be displayed automatically (if the Single grid ROE shows a negative number, you can modify your interval or grid number to make the single grid ROE reach a positive number)
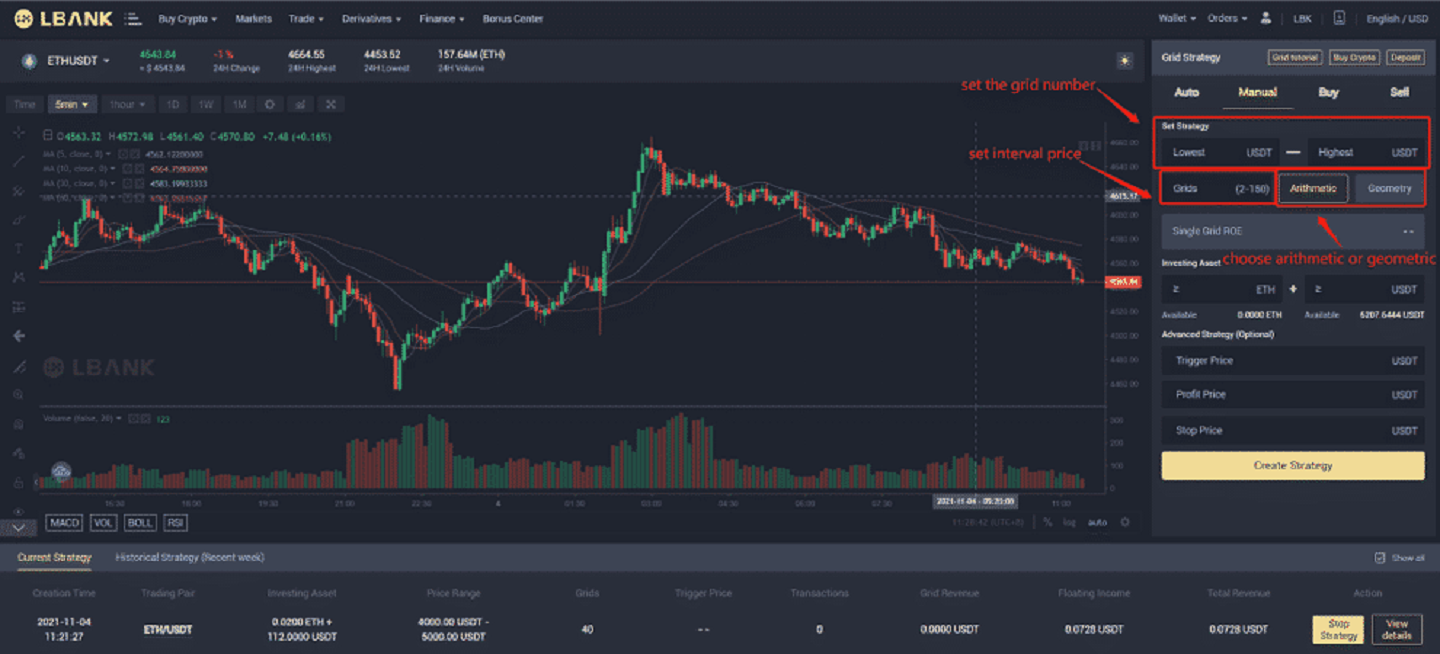
Terminology 1:
The interval highest price: the upper boundary of the price range, when the price exceeds the interval highest price, the system will no longer operate (the interval highest price shall be higher than the interval lowest price).
Terminology 2:
The interval lowest price: the lower boundary of the price range, when the price is lower than the interval lowest price, the system will no longer perform (the interval lowest price shall be lower than the interval highest price).
Terminology 3:
Price range: a configured price range that the grid trading runs.
Terminology 4:
Grid number: The number of orders to be placed within the configured price range.
Terminology 5:
Invested assets: the number of crypto assets that the user will invest in the grid strategy.
(4) In the "invested assets" - fill in the amount of BTC and USDT that you want to invest in (the amount of BTC and USDT automatically displayed here is the minimum capital investment amount required.)
(5) Advanced strategy (Optional) - "Trigger price" (Optional): The grid orders will be triggered when the Last Price / Mark price rises above or falls below the trigger price you enter.
(6) Advanced strategy - "stop loss price" and "sell limit price" (Optional) when the price is triggered, grid trading will stop immediately.
(7) After the above steps, you may click "Create Grid"
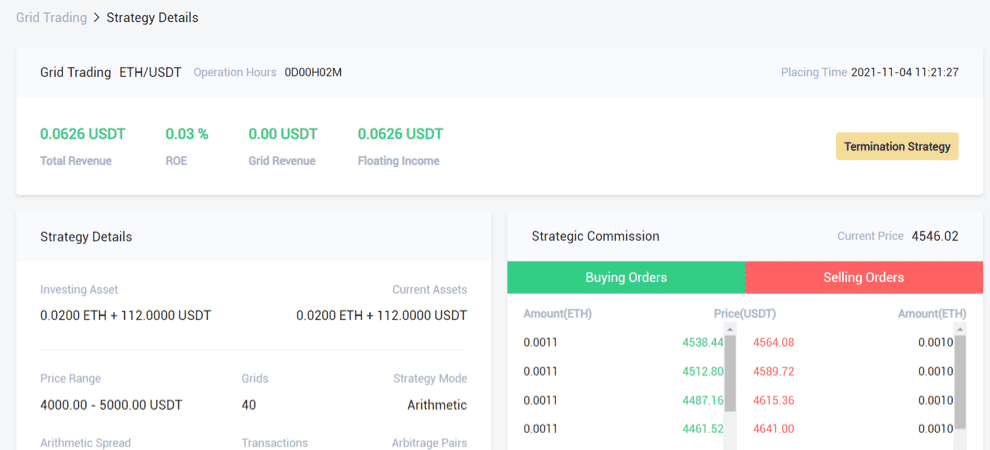
(8) All the strategies will be displayed under the "current strategy", and you may also click on "View Details" to see more details.

(9) In "View Details" there are two specific sections, "strategy details" and "strategy commissions".
Terminology 6:
Single profit (%): after the user sets the parameters, the revenue that each grid will generate is calculated by backtesting the historical data.
Terminology 7:
7-day annualized backtest yield: the expected annualized yield according to the parameters set by the user. It is calculated by using historical 7-day K-line data and the set parameters with this formula —— "historical 7-day yield/7*365".
Terminology 8:
Arithmetic grid: when creating a grid strategy, each grid width is the same.
Terminology 9:
Geometric grid: when creating a grid strategy, each grid width is equally proportional.
Terminology 10:
Sell limit price: the price when the market price comes to or higher than that, the grid trading system will automatically stop and sell the order and transfer the crypto to the spot wallet. (The sell limit price shall be higher than the highest boundary of the price range).
Terminology 11:
Stop Loss Price: When the price drops to or lower than the stop loss price, the system will immediately stop and sell the coin and transfer the crypto to the spot wallet. (The stop loss price shall be lower than the lowest boundary of the price range).
Terminology 12:
Grid Profit: the total amount of profit made through a single grid
Terminology 13:
Floating Profit: the difference between the total amount of invested assets and the total amount of currently held assets.
Terminology 14:
total return: grid profit + floating profit
5. Use LBNAK’s recommended grid (Auto)
(1) Select the grid trading pair you want to open, the recommended strategy will automatically use LBANK’s AI strategy to choose the best strategy for the user. No need to add parameters manually.
(2) In the "invested assets" - fill in "BTC + USDT to be invested" (the amount of BTC and USDT automatically displayed here is the amount of the minimum assets required)
(3)Advanced strategy (Optional) - "Trigger price" (Optional): The grid orders will be triggered when the Last Price / Mark price rises above or falls below the trigger price you enter.
(4) Advanced strategy - "stop loss price" and "sell limit price" (Optional) when the price is triggered, grid trading will stop immediately.
(5) After the above steps, you may click "Create Grid"
Risk Warning: Grid trading as a strategic trading tool should not be regarded as financial or investment advice from LBank. Grid trading is used at your discretion and at your own risk. LBank will not be liable to you for any loss that might arise from your use of the feature. It is recommended that users should read and fully understand the Grid Trading Tutorial and make risk control and rational trading within their financial ability.
How to start grid trading on LBank application
Step 1: Log in to your LBank account and go to the spot trading page by clicking [Grid]. 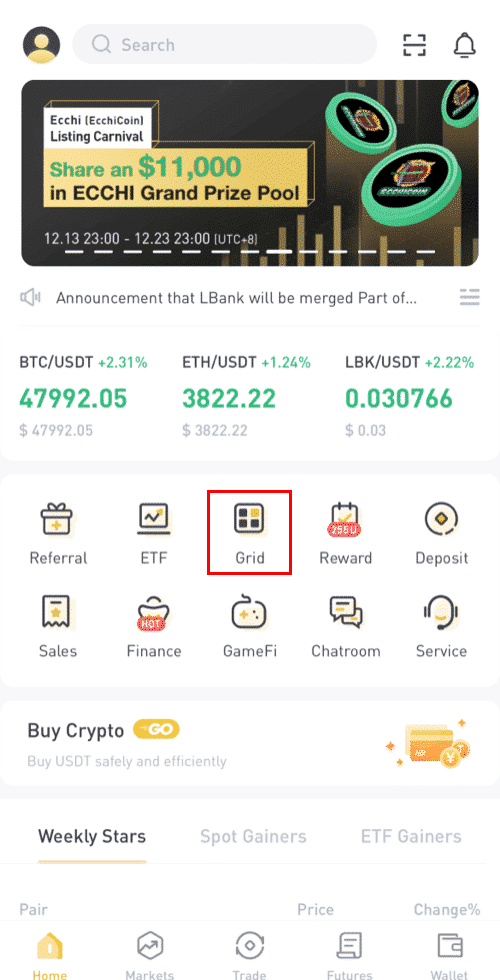
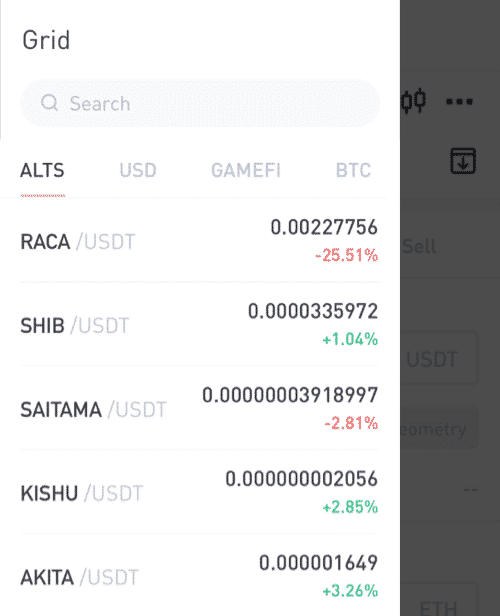
Step 2: Choose the assets you want to invest (Here we are using BTC/USDT as an example).
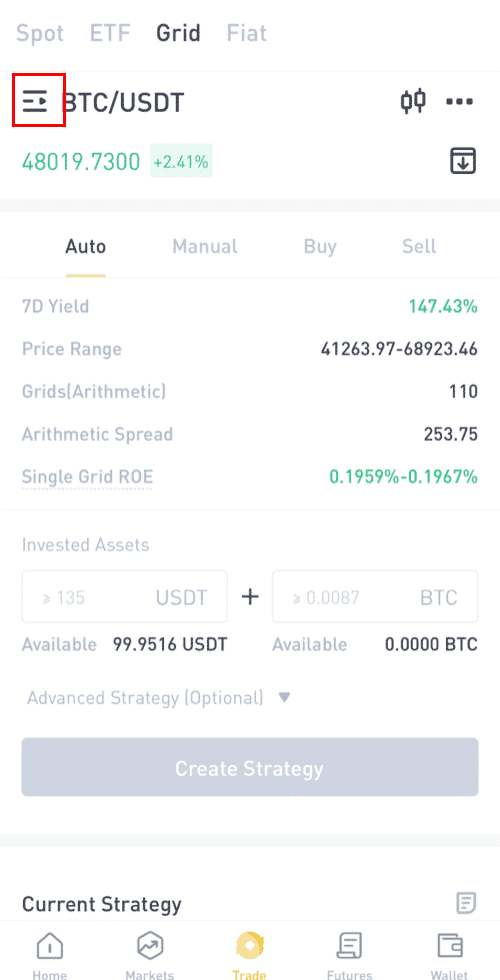
Step 3: You may choose an auto strategy or create your own strategy manually.
Auto strategy: Recommended strategy based on the market trends provided by LBank.
Create grid manually: Set and adjust the strategy on your own.
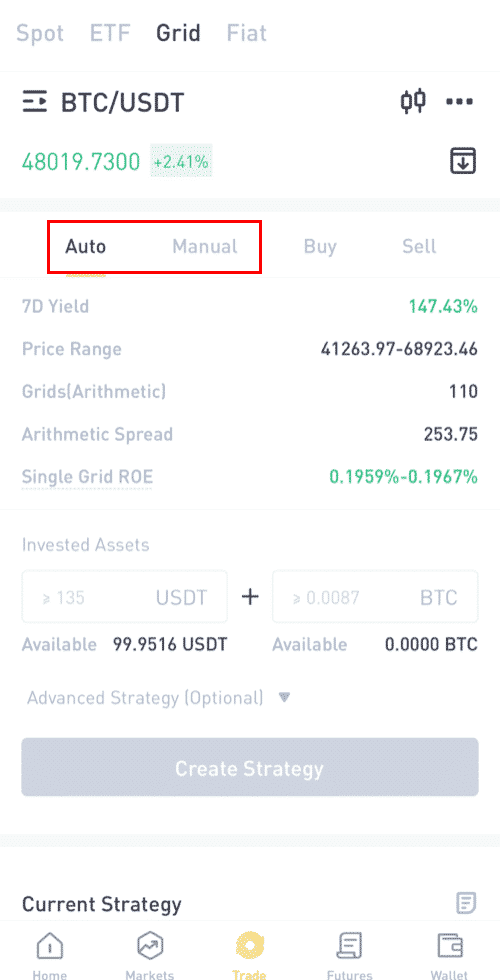
Step 4: Create a strategy.
Using “Auto strategy”:
(1) (Optional) Firstly, you can view the details of the auto strategy and the estimated returns.
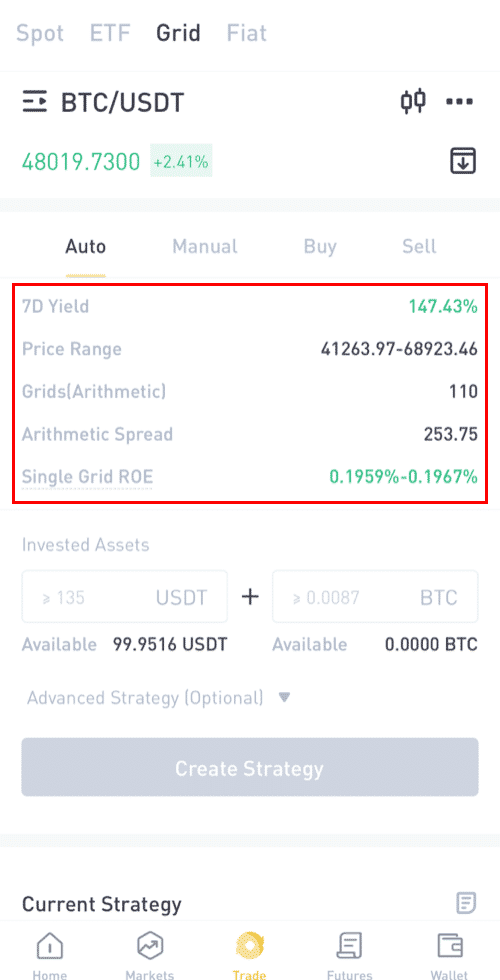
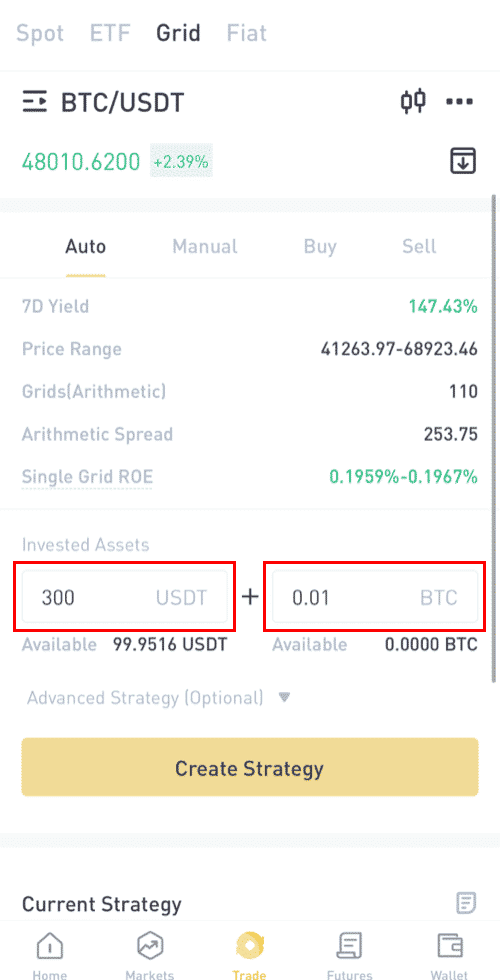
(2) Input the amounts of assets you want to invest.
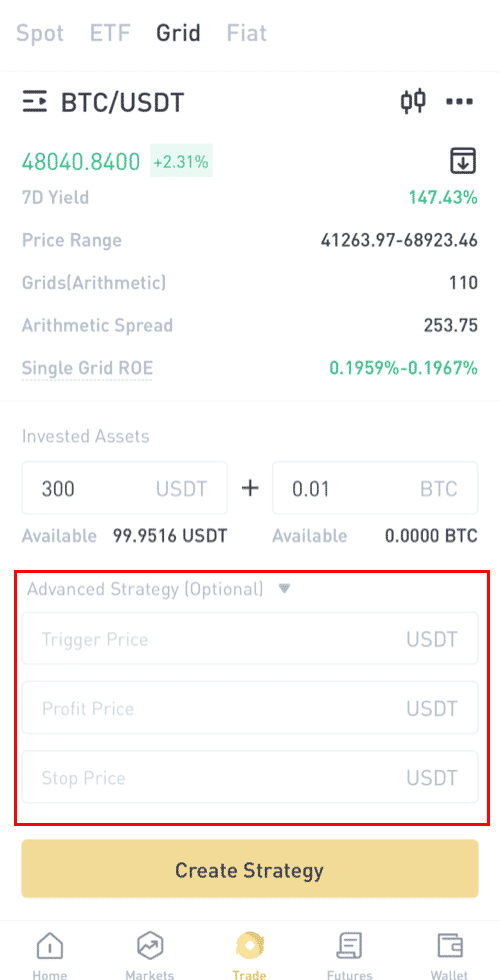
(3)Advanced Strategy (Optional).
Set Trigger Price: If the price reaches the trigger price, your grid strategy will automatically start.
Set Profit Price: If the price goes beyond the profit price, your grid strategy will automatically stop.
Set Stop Price: If the price goes below the stop price, your grid strategy will automatically stop.
(4) Click “Create strategy” and confirm, then your strategy is created.
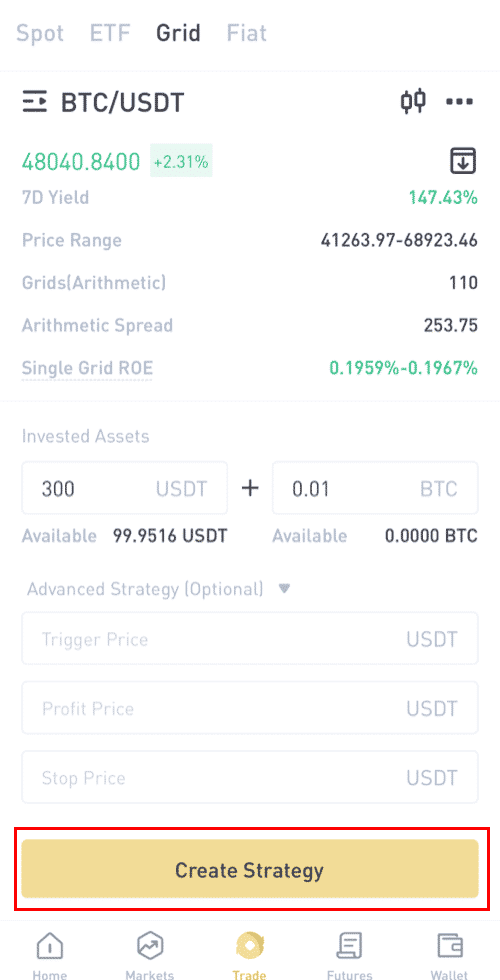
Using “Create grid manually”:
(1) Set price range.
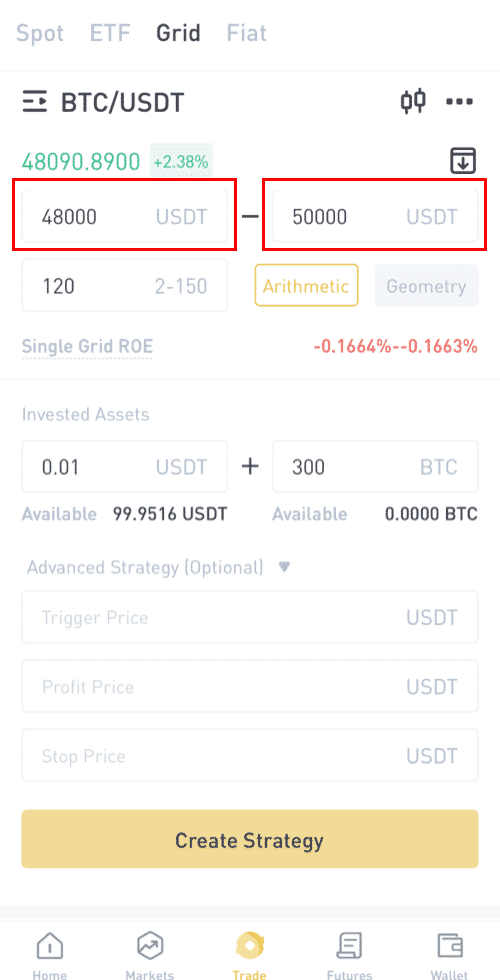
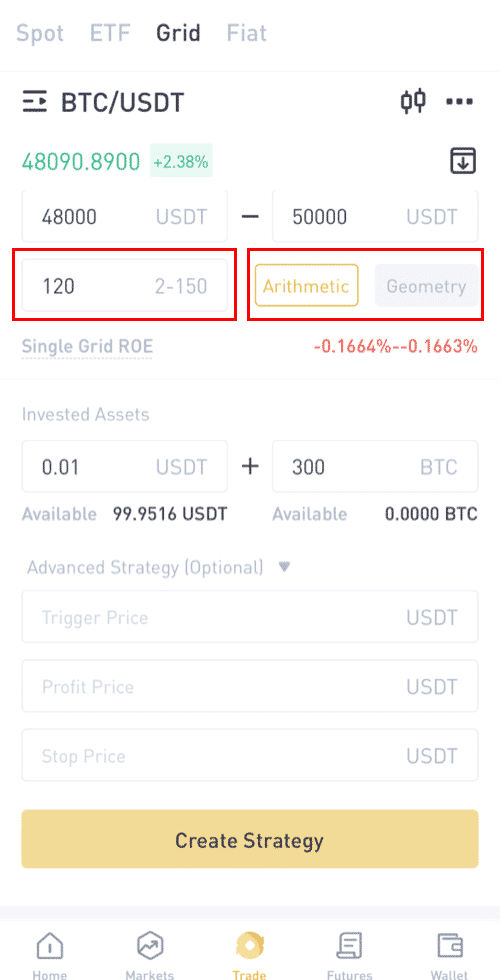
(2) Set the number of grids and choose “Arithmetic grid” or “Proportional grid”.
(3) Input the amounts of assets you want to invest.
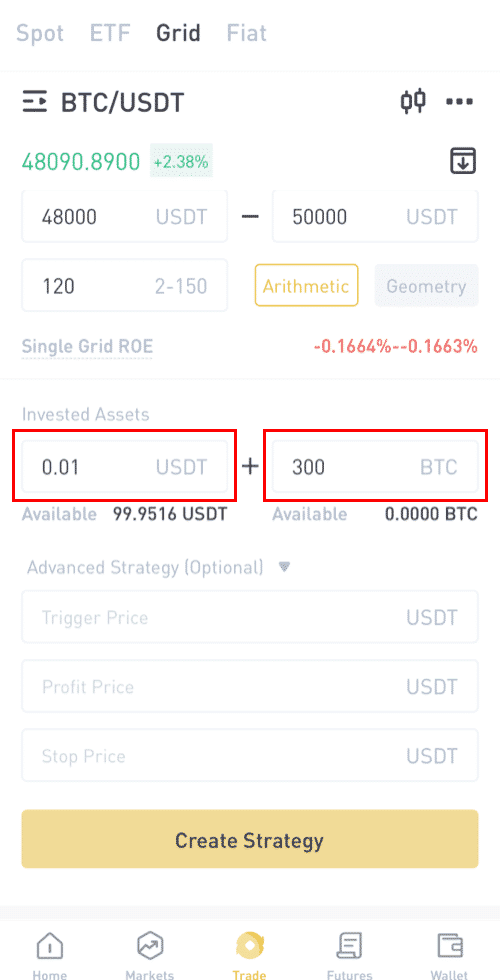
(4) Advanced Strategy (Optional)
Set Trigger Price: If the price goes beyond the trigger price, your grid strategy will automatically start.
Set Profit Price: If the price goes beyond the profit price, your grid strategy will automatically stop.
Set Stop Price: If the price goes below the stop price, your grid strategy will automatically stop.
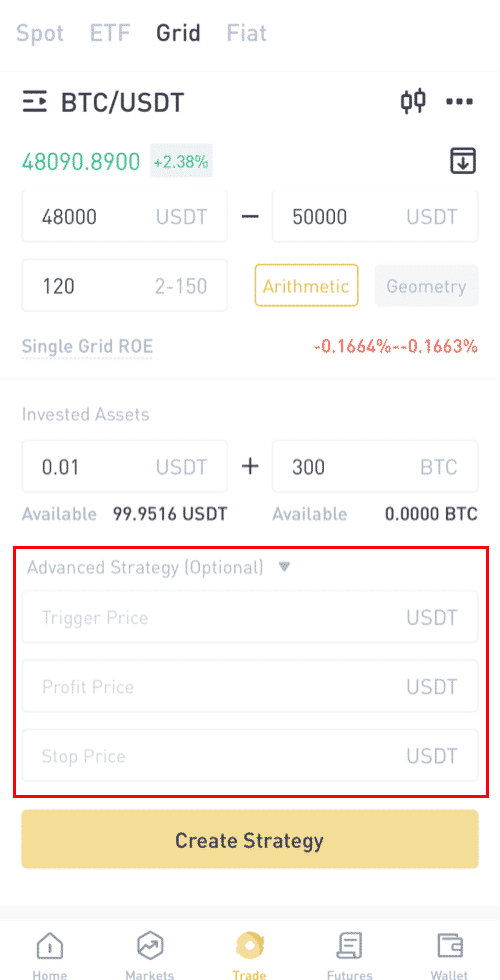
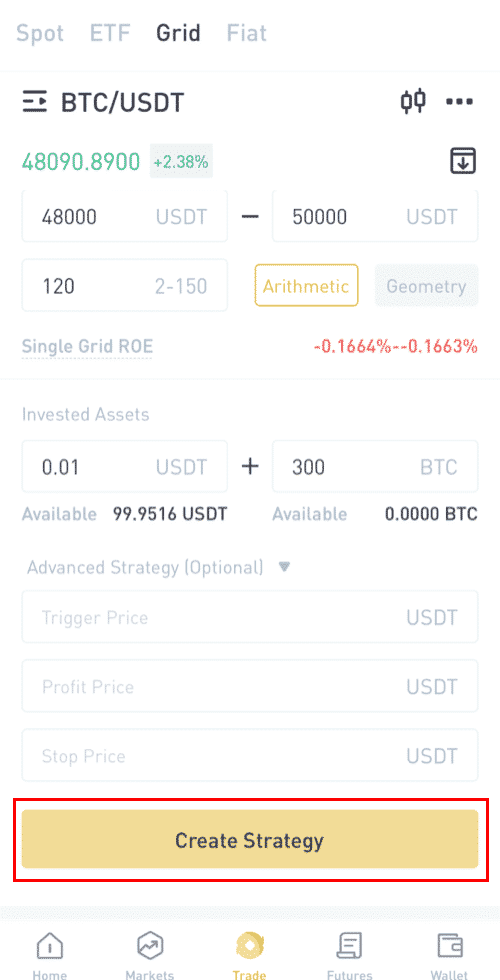
(5) Click “Create strategy” and confirm, then your strategy is created.
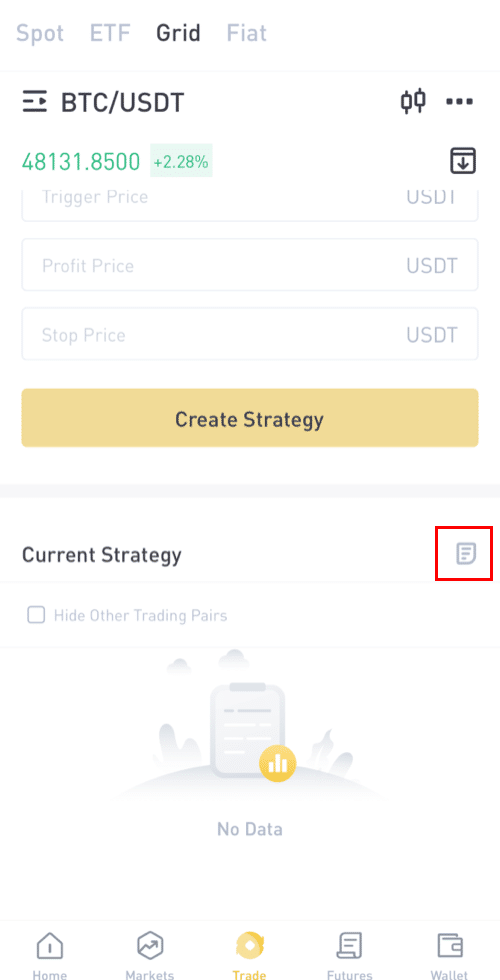
Frequently Asked Questions
Trading Fees (From 14:00 on April 7, 2020, UTC+8)
Users’ trading fees of currency exchange (will be deducted from the assets received) will be adjusted as follows (From 14:00 on April 7, 2020, UTC+8):Taker: +0.1%
Maker: +0.1%
If you encounter any problems, please contact our official email service, [email protected], and we will provide you with the most satisfactory service. Thank you again for your support and understanding!
At the same time, you are welcome to join LBank global community to discuss the latest information (Telegram): https://t.me/LBankinfo.
Online customer service working time: 7 X 24 hours
Request system: https://lbankinfo.zendesk.com/hc/zh-cn/requests/new
Official email: [email protected]
How to understand the definition of Maker Taker
What is Maker?Maker is an order placed at a price you specify (below the market price when placing a pending order or higher than the market price when placing a pending order). Your order is filled. Such an action is called Maker.
What is Taker?
Take order refers to the order at the price you specified (there is an overlap with the order in the market depth list). When you place an order, you immediately trade with other orders in the depth list. You actively trade with the order in the depth list. This behavior is called Taker.
Differences Between Spot Trading and Futures Trading
This section outlines key differences between Spot trading and Futures trading and introduces basic concepts to help you read deeper into a futures contract.In a futures market, prices on the exchange are not ‘settled’ instantly, unlike in a traditional spot market. Instead, two counterparties will make a trade on the contract, with settlement on a future date (when the position is liquidated).
Important note: Due to how the futures market calculates unrealized profit and loss, a futures market does not allow traders to directly buy or sell the commodity; instead, they are buying a contract representation of the commodity, which will be settled in the future.
There are further differences between a perpetual futures market and a traditional futures market.
To open a new trade in a futures exchange, there will be margin checks against collateral. There are two types of margins:
- Initial Margin: To open a new position, your collateral needs to be greater than the Initial Margin.
- Maintenance Margin: If your collateral + unrealized profit and loss fall below your maintenance margin, you will be auto-liquidated. This results in penalties and additional fees. You can liquidate yourself before this point to avoid being auto-liquidated.
Due to leverage, it is possible to hedge out spot or holding risk with relatively small capital outlays in the futures market. For example, if you are holding 1000 USDT worth of BTC, you can deposit a much smaller (50 USDT) collateral into the futures market, and short 1000 USDT of BTC to fully hedge out the positional risk.
Note that futures prices are different from spot market prices, because of carrying costs and carrying returns. Like many futures markets, LBank uses a system to encourage the futures market to converge to the ‘mark price’ via funding rates. While this will encourage long-term convergence of prices between spot and futures for the BTC/USDT contract, in the short term there may be periods of relatively large price differences.
The premier futures market, Chicago Mercantile Exchange Group (CME Group), provides a traditional futures contract. But modern exchanges are moving toward the perpetual contract model.
Ways to Withdraw from LBank
Withdraw Crypto from LBank application
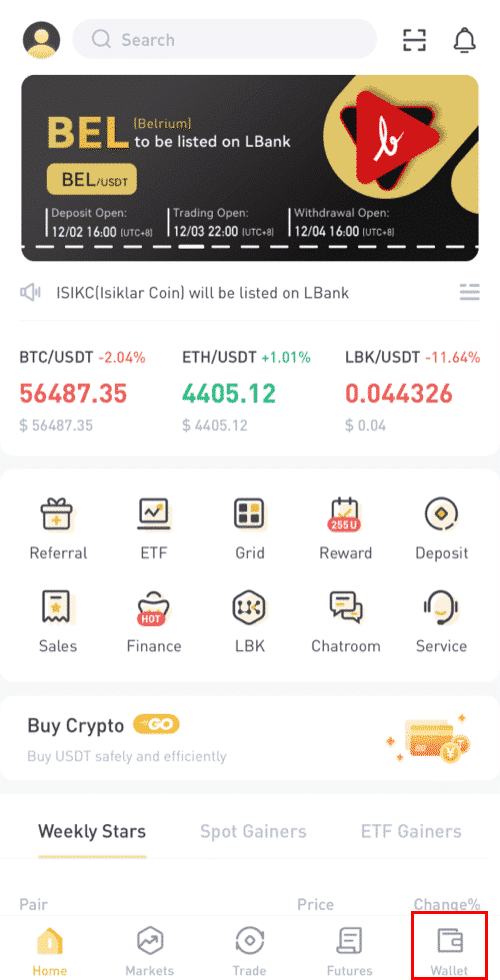
Let’s use USDT (TRC20) to illustrate how to transfer crypto from your LBank account to an external platform or wallet.1. Enter your LBank login information and select [Wallet].
2. Click on [Withdraw].
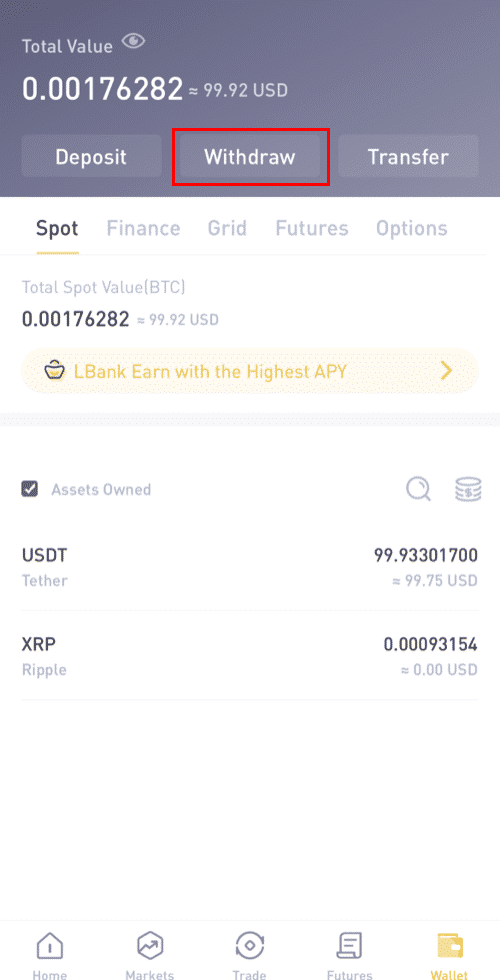
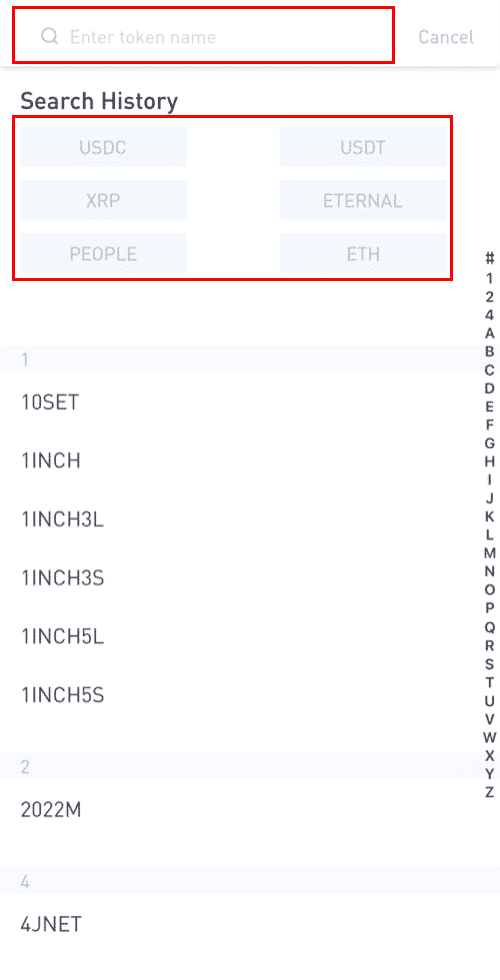
3. Make the cryptocurrency withdrawal choice. In this illustration, we shall take out USDT.
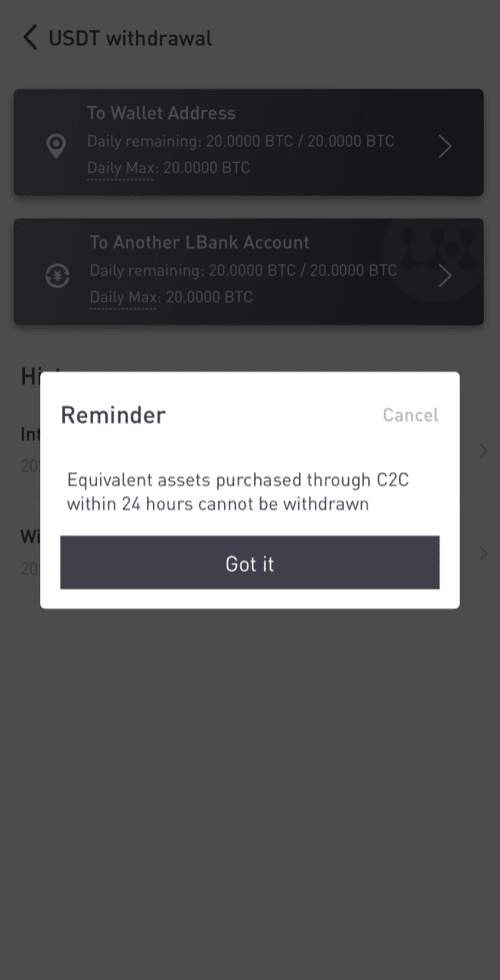
4. Please notice that equivalent assets purchased through C2C within 24 hours cannot be withdrawn.
5. Select the wallet address.
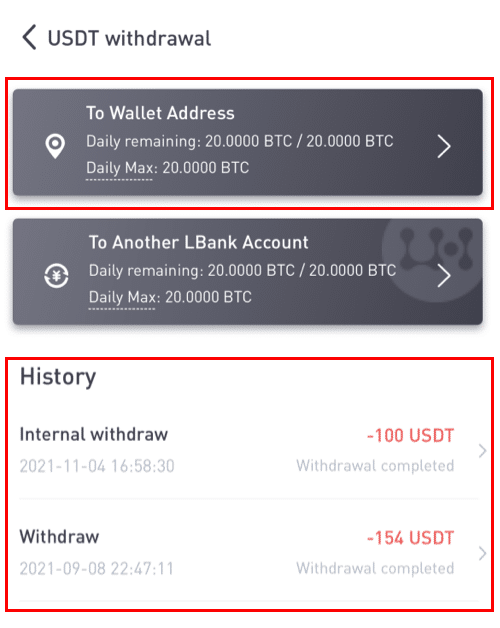
6. Select the TRC20 network. Then, enter the address and withdrawal amount. (Note is optional). Then click [Confirm].
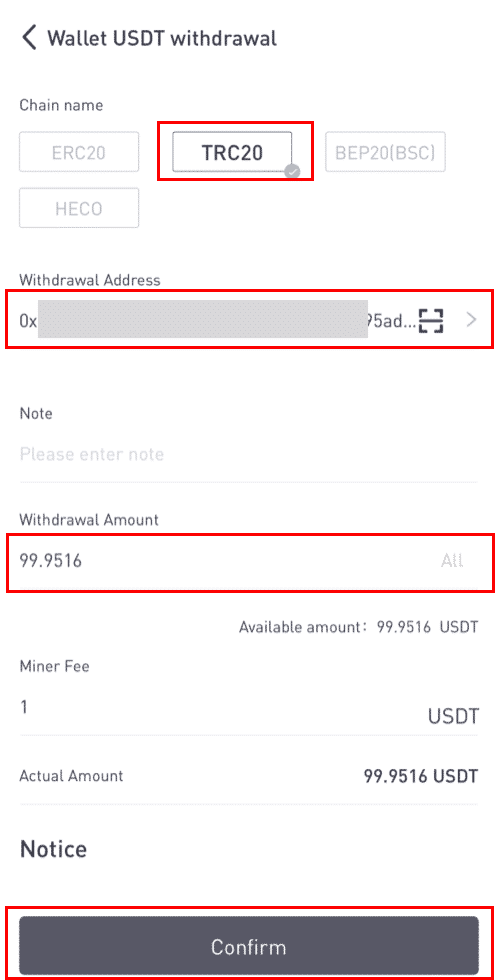
When you withdraw other tokens (such as XRP), you may be asked to fill in MEMO:
- MEMO is optional. For example, you need to provide the MEMO when sending funds to another LBank account or to another exchange. You do not need a MEMO when sending funds to a Trust Wallet address.
- Make sure to double-check if a MEMO is required or not. If a MEMO is required and you fail to provide it, you may lose your funds.
- Note that some platforms and wallets refer to the MEMO as Tag or Payment ID.
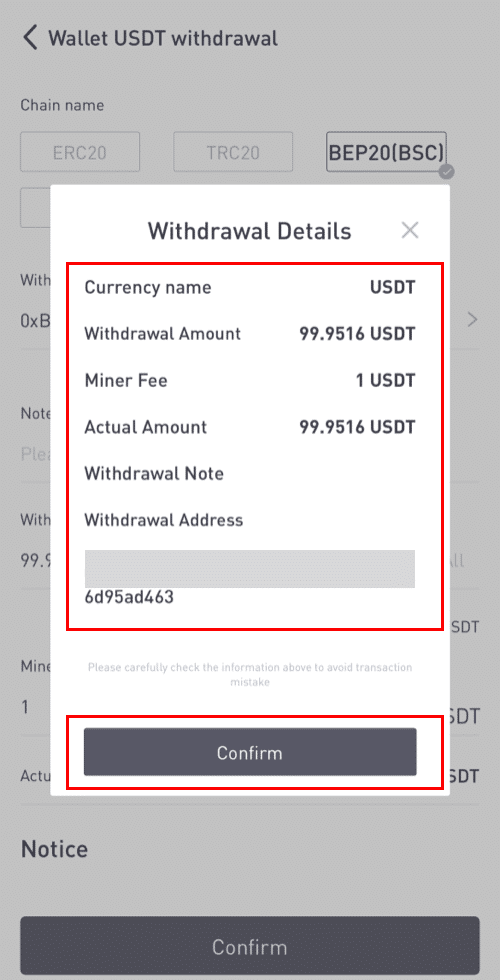
7. Verify the specifics of the withdrawal.
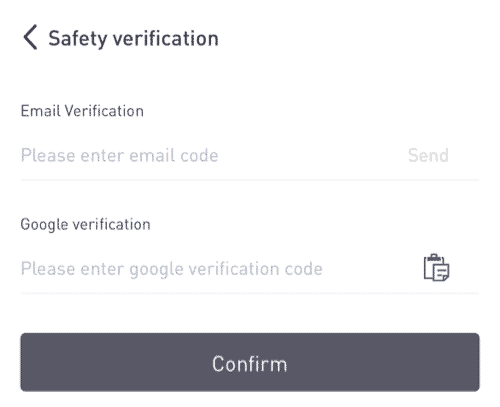
8. Enter the verification codes for Google and for email.
How to add a new recipient address?
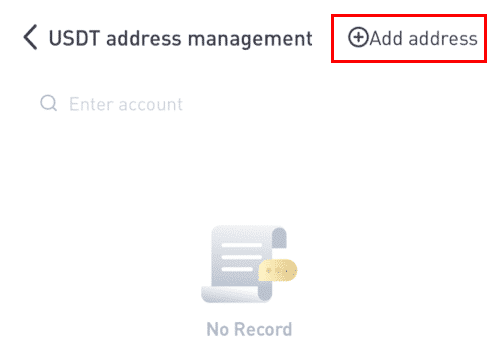
1. To add a new recipient, click [].
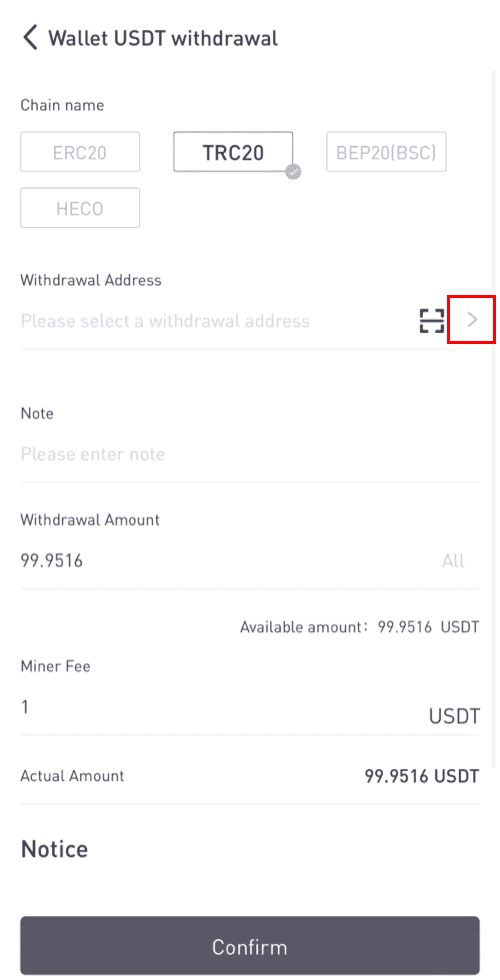
2. Click [Add Address].
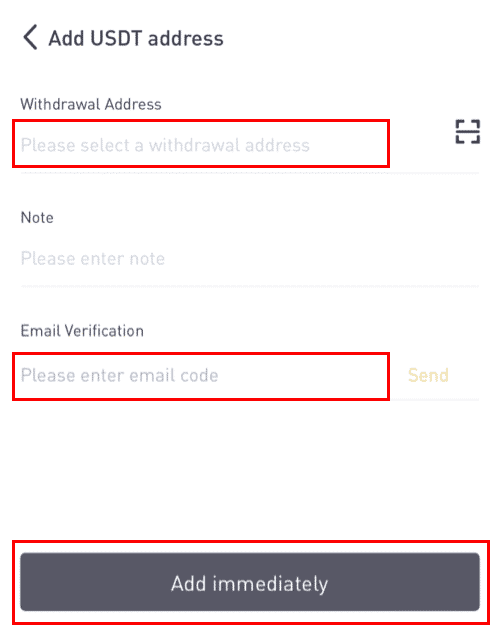
3. Type the email and address verification codes. You’ve added a new address after clicking [Add immediately]. The note is not required.
Withdraw Crypto from LBank website
Let’s use USDT (ERC20) to illustrate how to transfer crypto from your LBank account to an external platform or wallet.
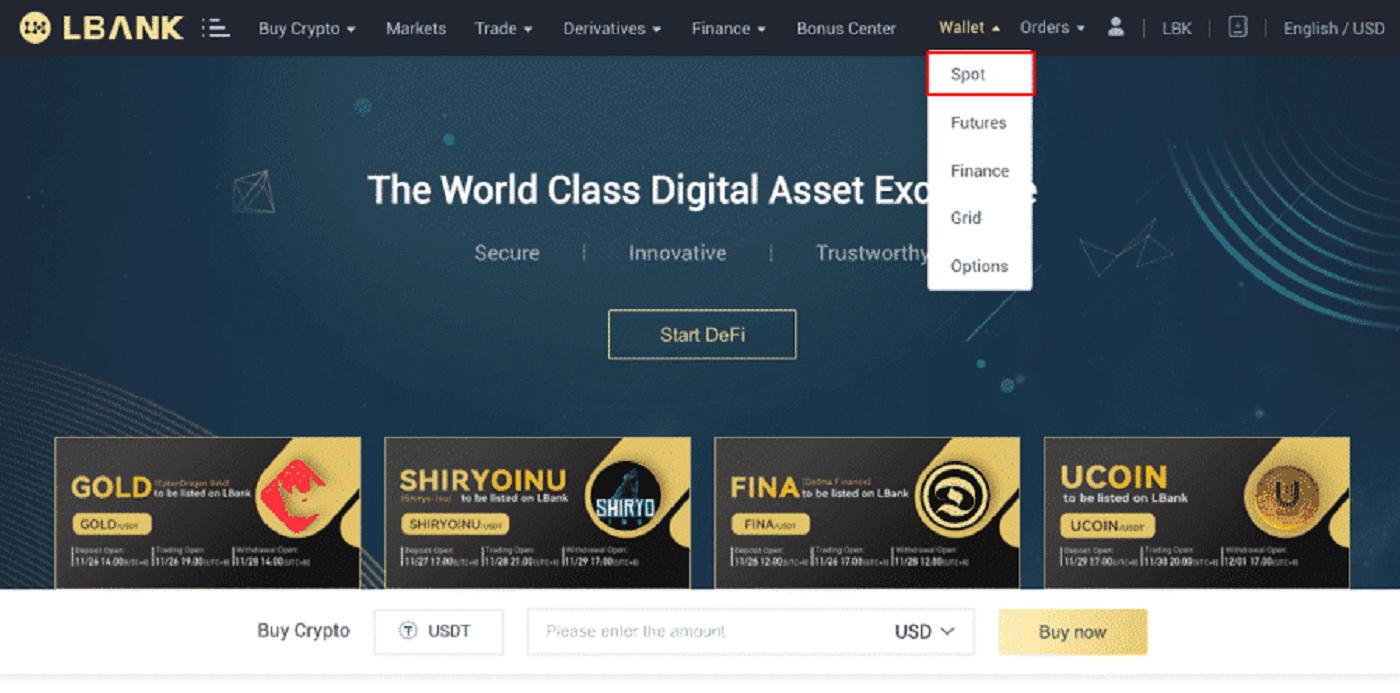
1. After signing in, click [Wallet] - [Spot].
 2. Click on [Withdraw].
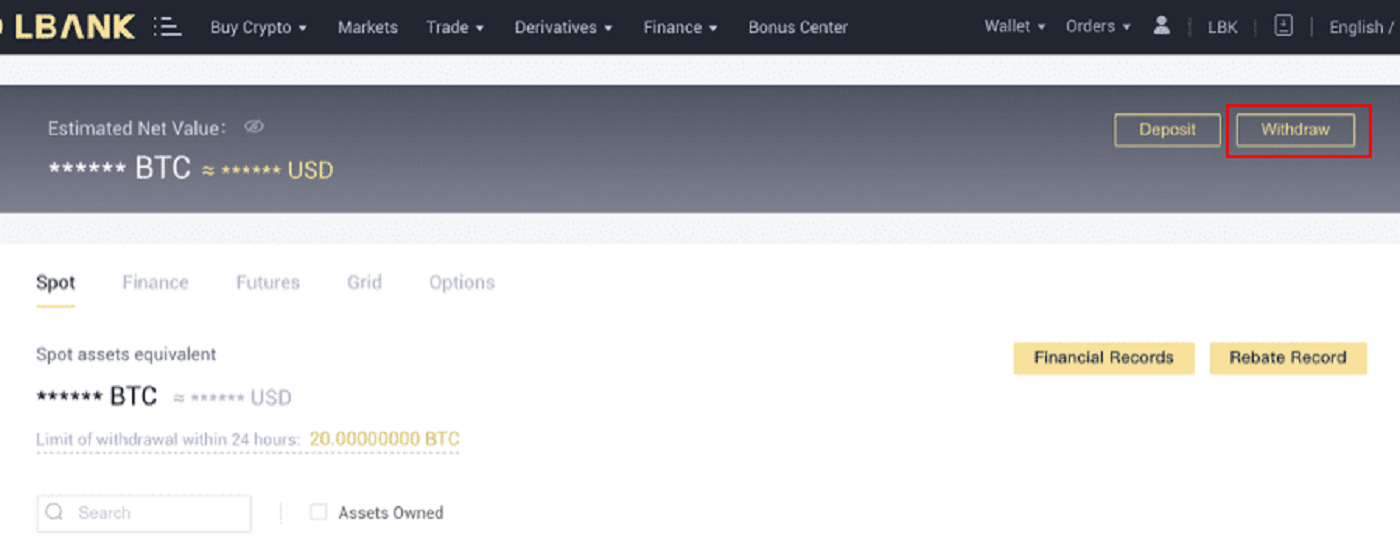
3. Make the cryptocurrency withdrawal choice. In this illustration, we shall take out USDT.
4. Select the network. As we are withdrawing BTC, we can choose either ERC20 or TRC20. You will also see the network fees for this transaction. Please make sure that the network matches the addresses the network entered to avoid withdrawal losses.
5. Enter the recipient’s address or choose from your address book list afterward.
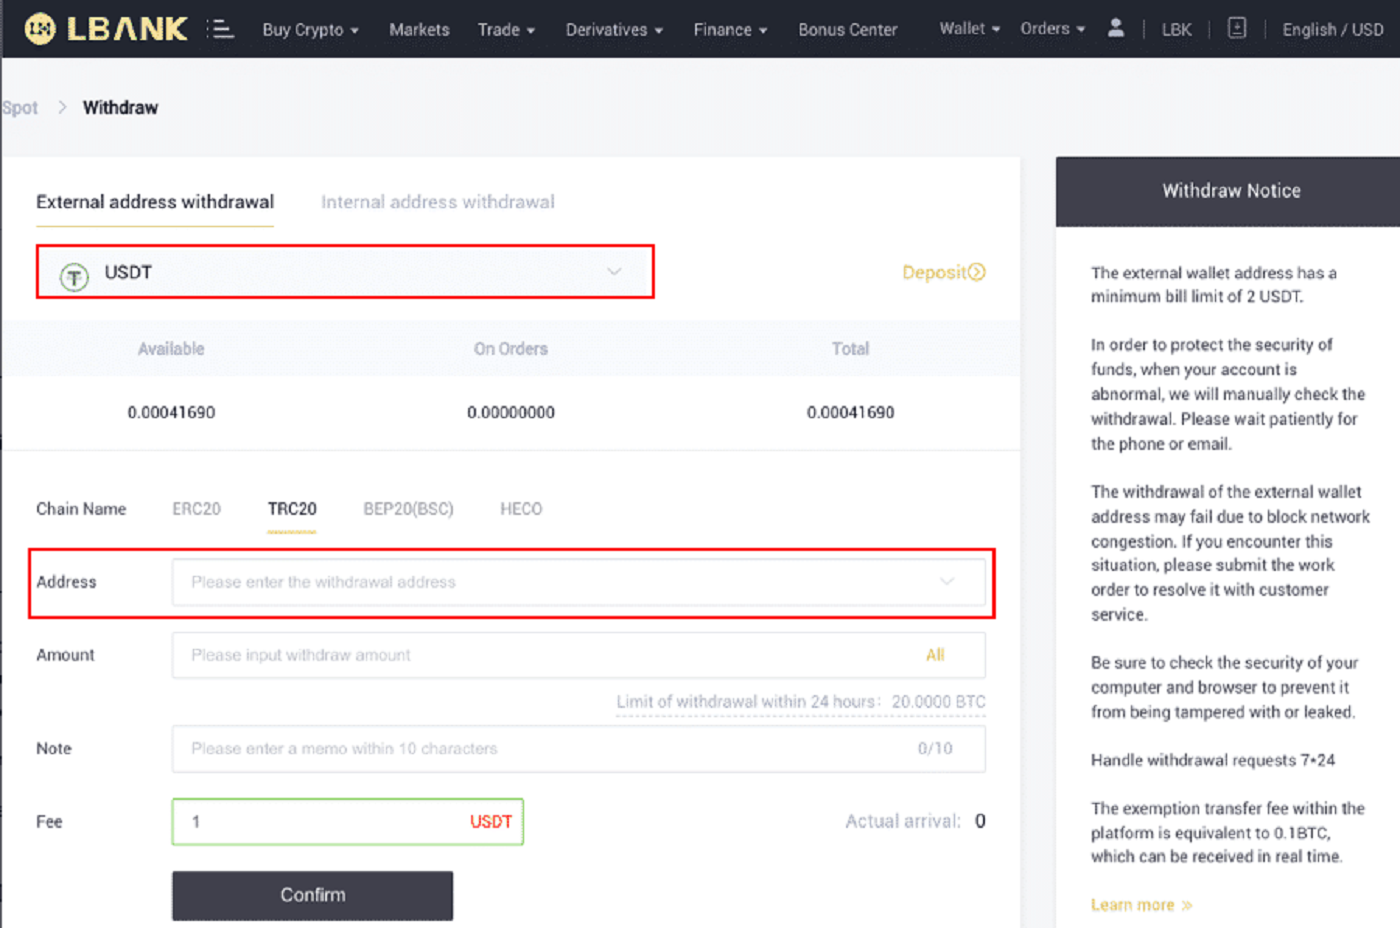
6. Select the coin and network. Then, enter the address.
- Wallet Label is a customized name you can give to each withdrawal address for your own reference.
- MEMO is optional. For example, you need to provide the MEMO when sending funds to another LBank account or to another exchange. You do not need a MEMO when sending funds to a Trust Wallet address.
- Make sure to double-check if a MEMO is required or not. If a MEMO is required and you fail to provide it, you may lose your funds.
- Note that some platforms and wallets refer to the MEMO as Tag or Payment ID.
7. Type in the sum you want to withdraw.
Warning: If you input the wrong information or select the wrong network when making a transfer, your assets will be permanently lost. Please, make sure that the information is correct before making a transfer.
How to add a new recipient address?
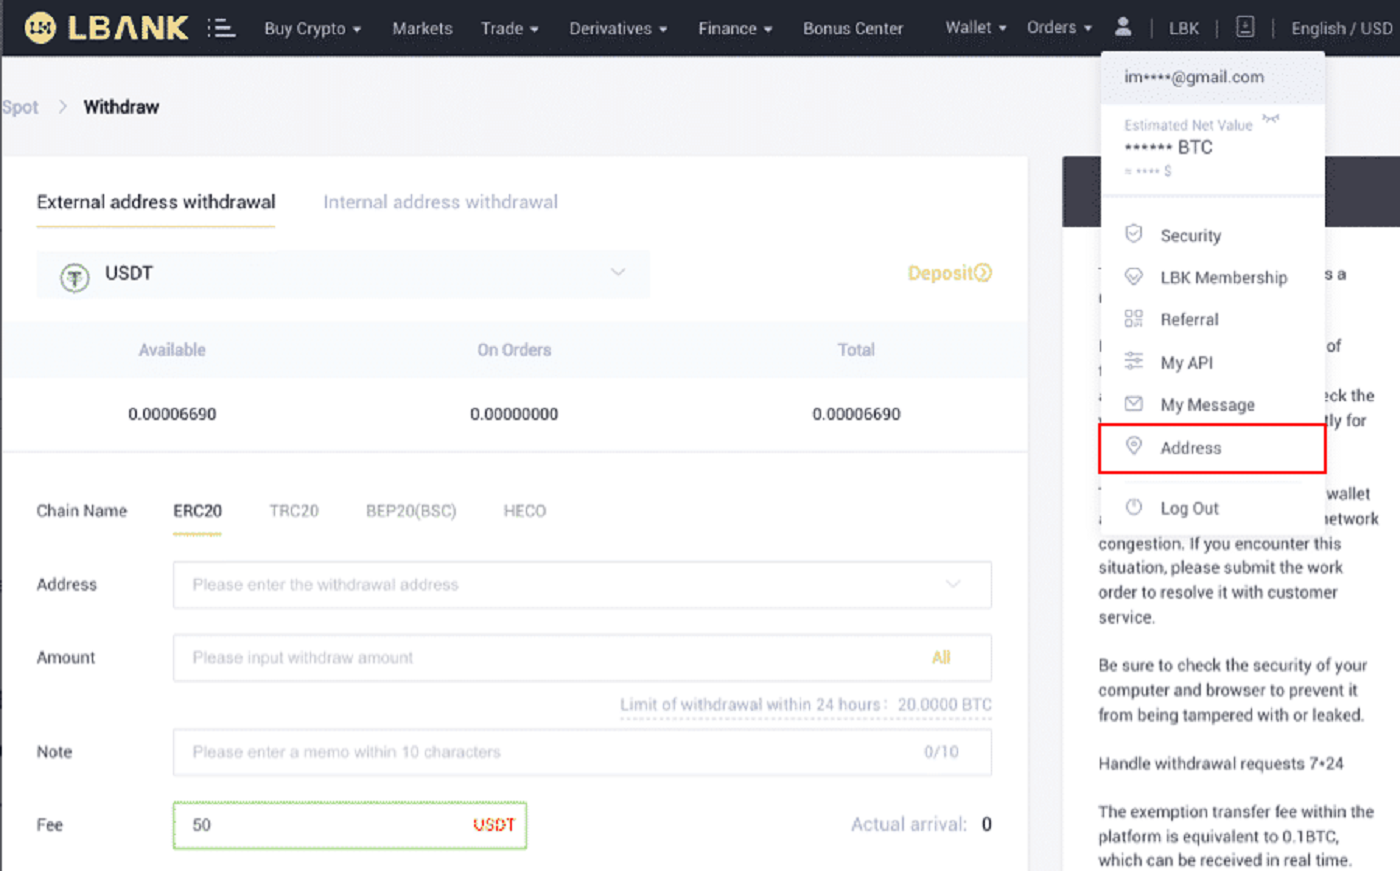
1. To add a new recipient, click account- [Address].
2. Click [Add Address].
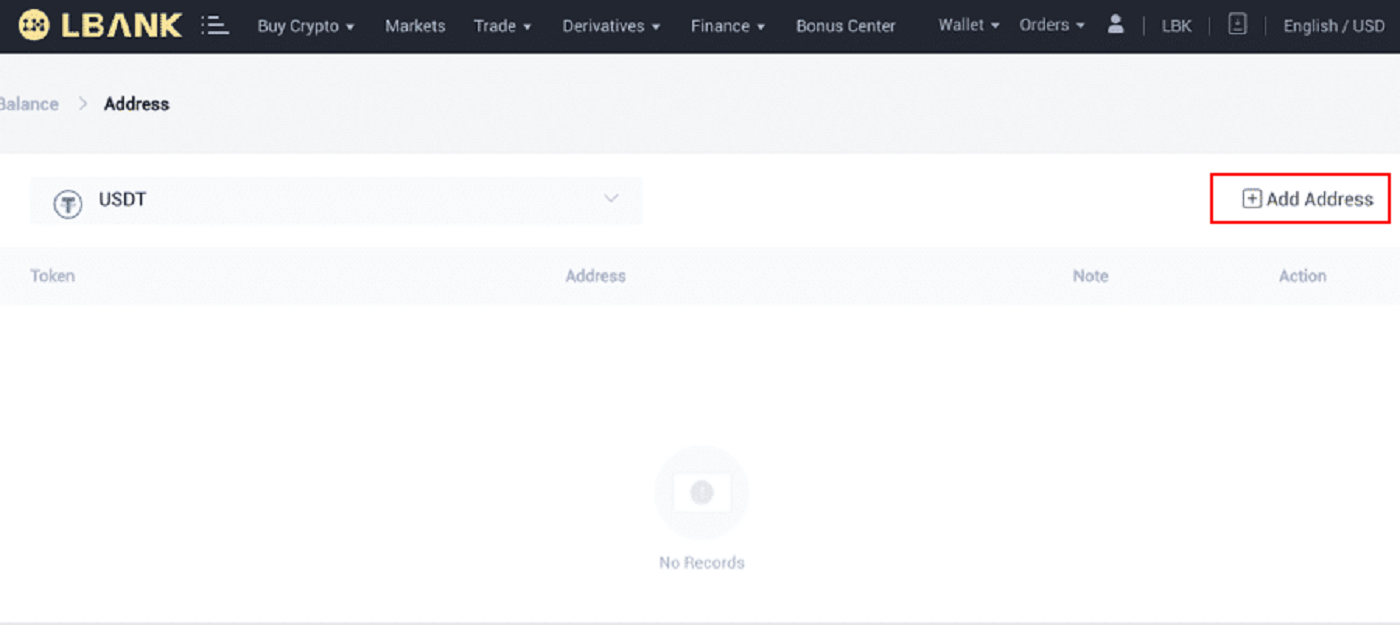
3. Type the following address as displayed in the screenshot:
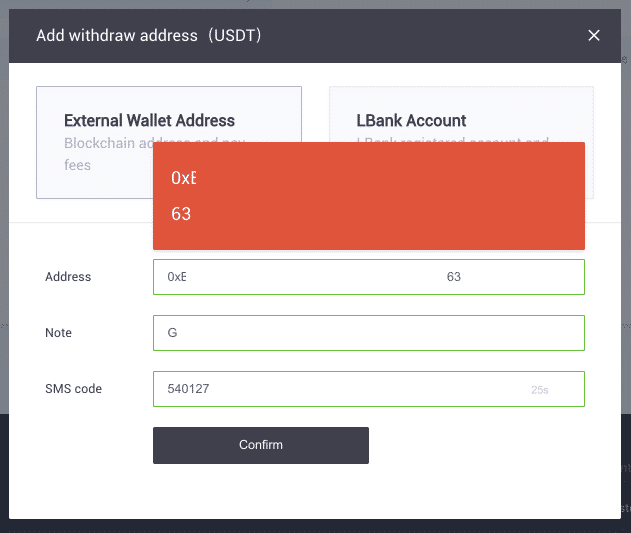
4. After clicking [Confirm], you will have added a new address.

Make Internal Transfer on LBank
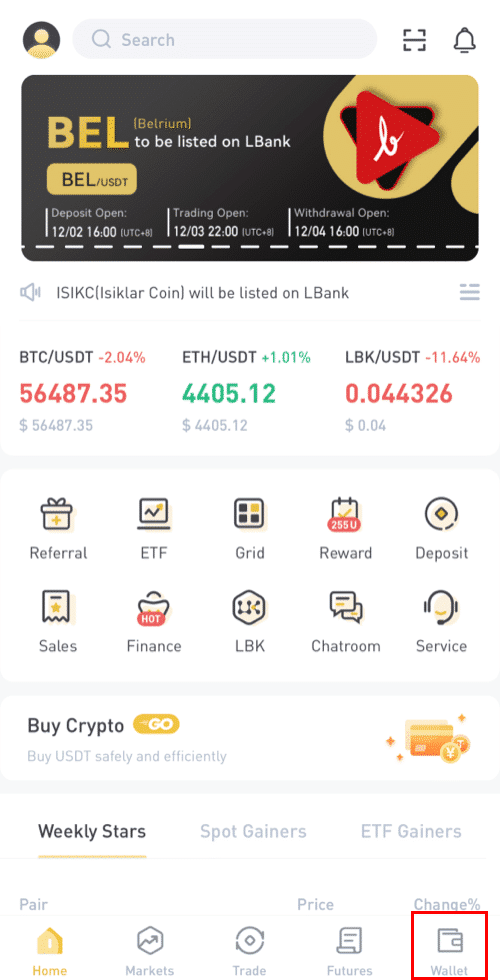
You can transfer money between two LBank accounts using the internal transfer feature. No transaction fees are required, and they will be credited right away.1. Click [Wallet] after logging into your LBank account.
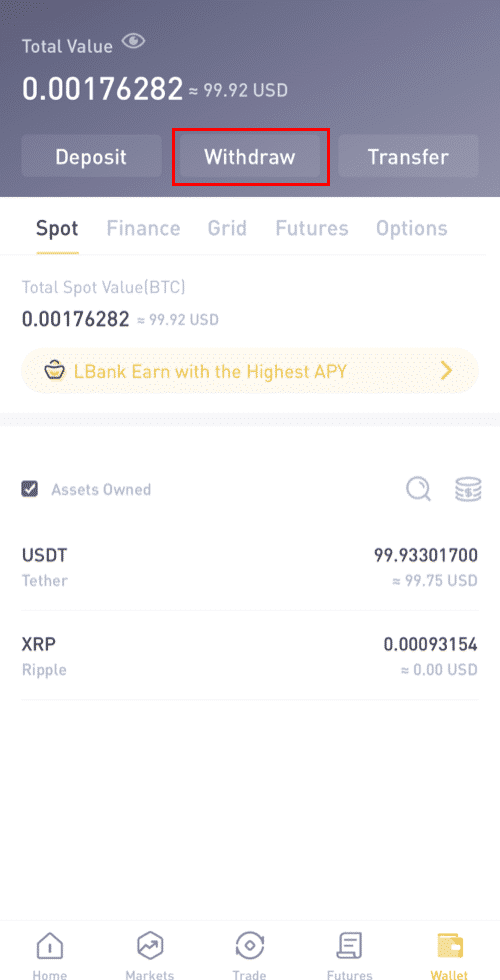
2. Click [Withdraw].
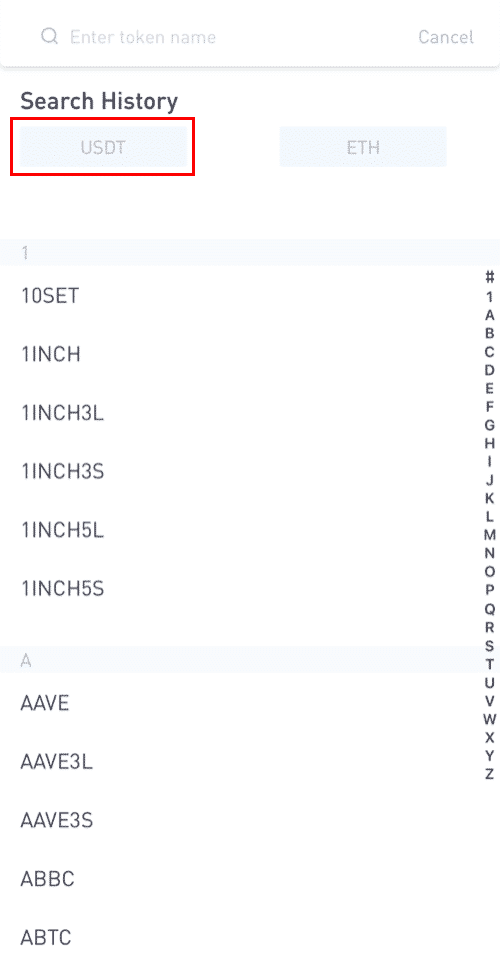
3. Pick the coin you want to withdraw.
4. Next, type the other LBank user’s recipient address or choose from your address book list.
Enter the amount to transfer. You will then see the network fee displayed on the screen. Please note the network fee will only be charged for withdrawals to non-LBank addresses. If the recipient’s address is correct and belongs to an LBank account, the network fee will not be deducted. The recipient account will get the amount indicated as [Receive amount].
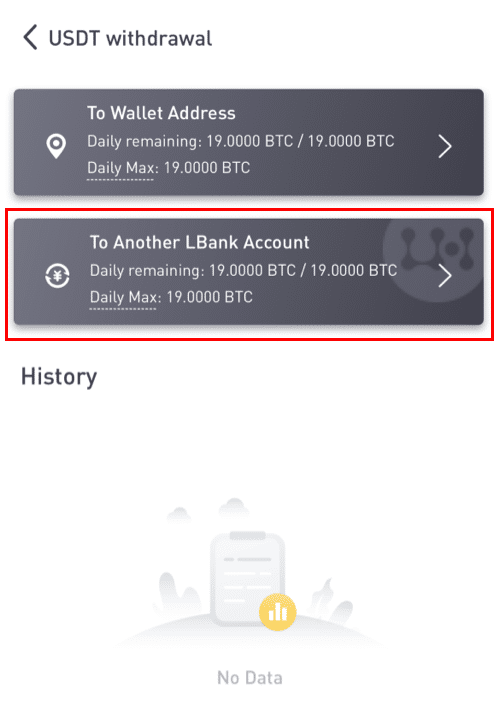
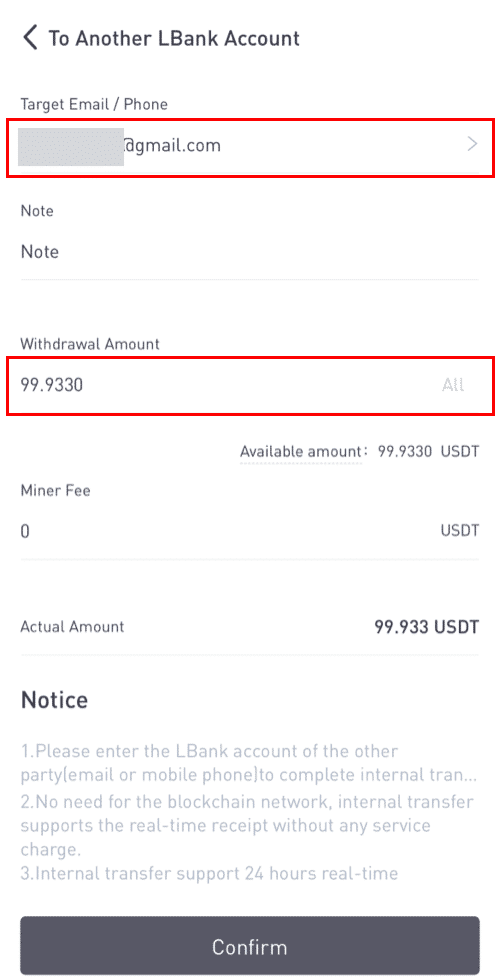
Please note: The fee exemption and instant arrival of the funds are only applicable when the recipient address belongs to an LBank account too. Please make sure that the address is correct and belongs to an LBank account.
Moreover, if the system detects that you are withdrawing a coin that requires a memo, the memo field is also mandatory. In such a case, you will not be allowed to withdraw without providing the memo; please provide the correct memo, otherwise, the funds will be lost.
7. Click [Submit] and you will be redirected to complete the 2FA Security verification for this transaction. Please double-check your withdrawal token, amount, and address before clicking [Submit].
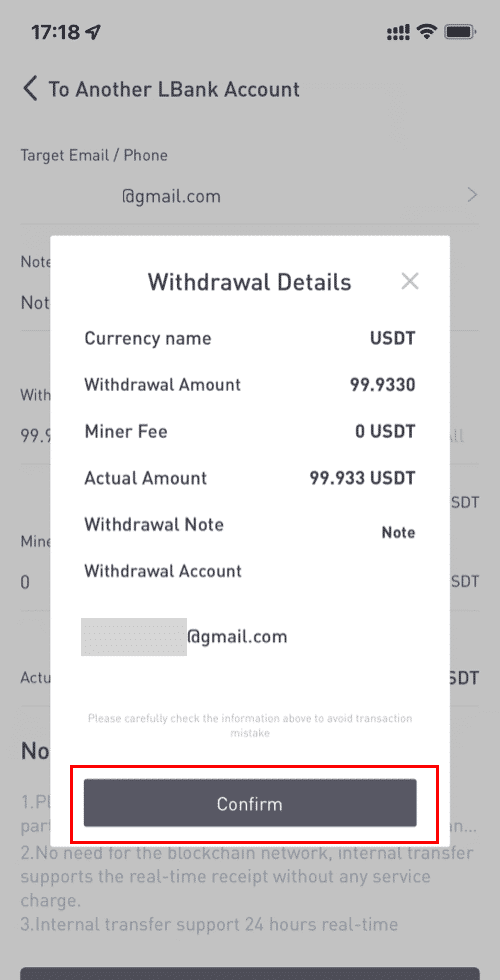
8. After the withdrawal is successful, you may return to [Wallet] - [Withdraw] - [**token name] to check the transfer status.
Please note that for internal transfer within LBank, no TxID will be created.
How to add an internal transfer address?
1. Click [Add account] if you don’t have an internal address.
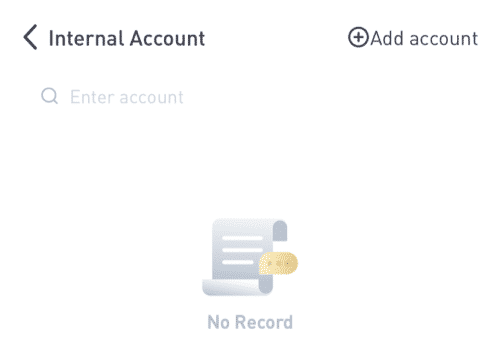
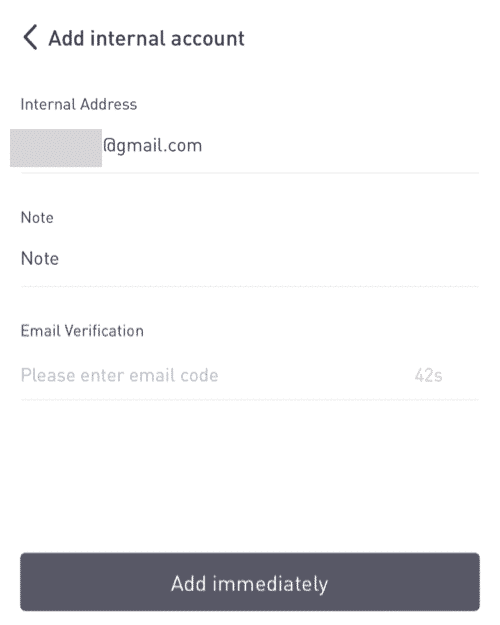
2. After that, you will be directed to the next page, where you may enter the information for the address, note, and email verification. Please confirm that the newly added address must be associated with an LBank account. Click [Add instantly] after that.
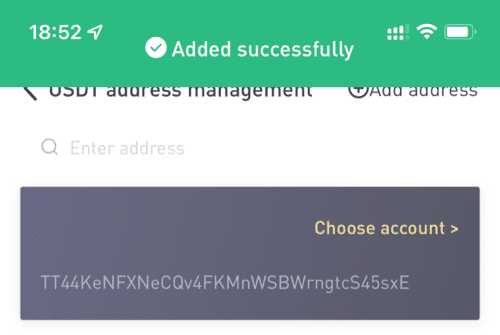
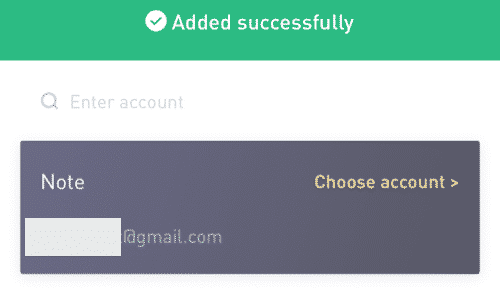
3. The address has been successfully inserted as the internal transfer address.
Sell Crypto on LBank with a Credit/Debit Card
1. After logging in, select [Buy Crypto] - [Credit/Debit Card] from the LBank account menu.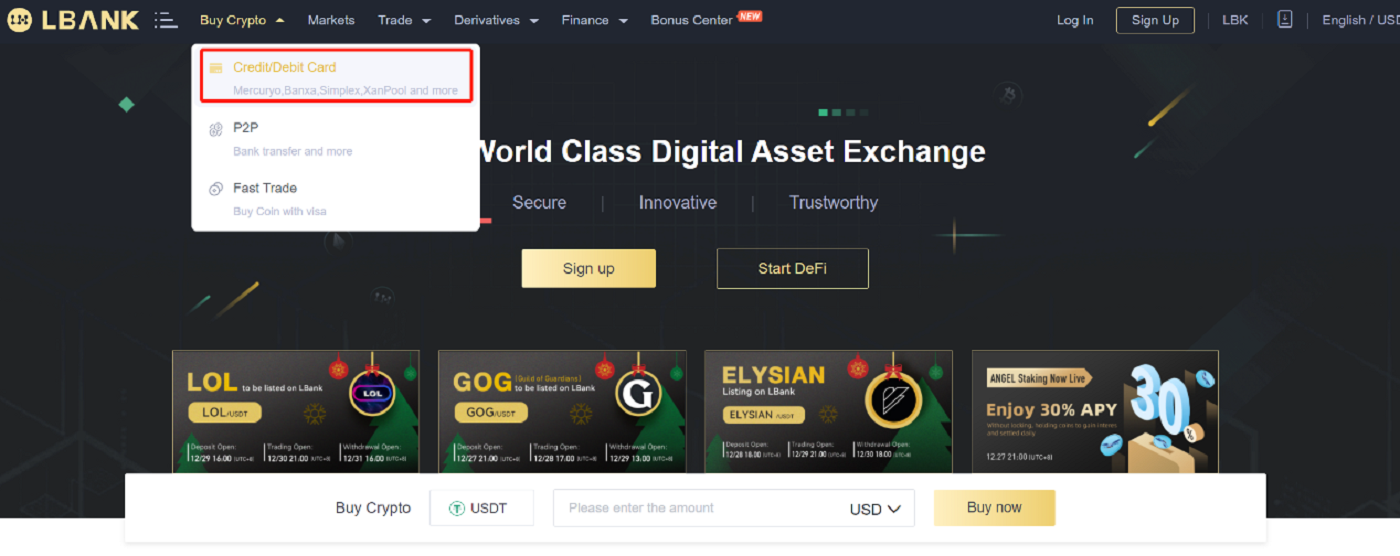
2. Click "Sell" on the Side.
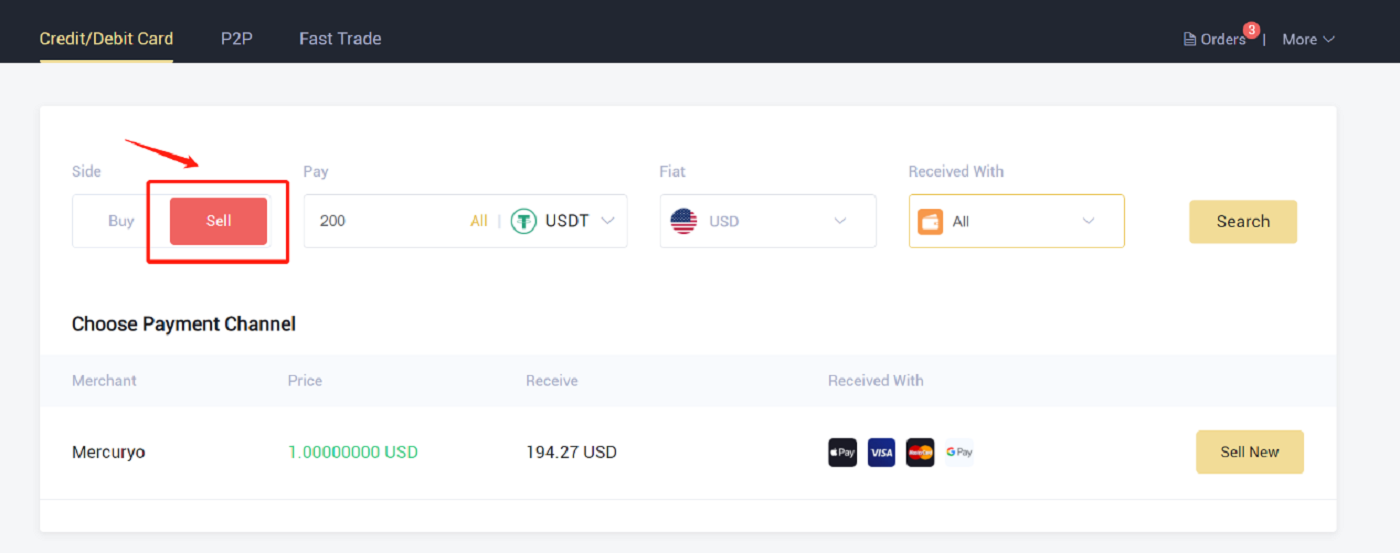
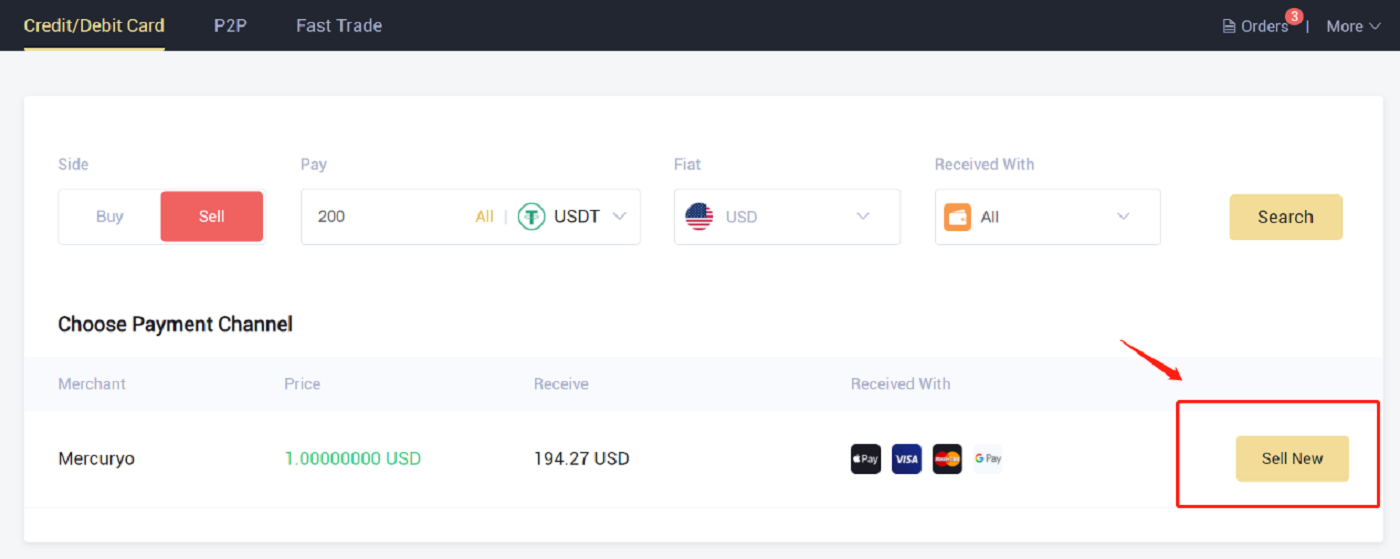
3. Enter the amount in the "Pay" and select the crypto that you wanted to sell. Then select the fiat currency you want to receive and the method of payment, and click "Search". In the list below, choose a third-party platform you want to trade, and click "Sell Now".
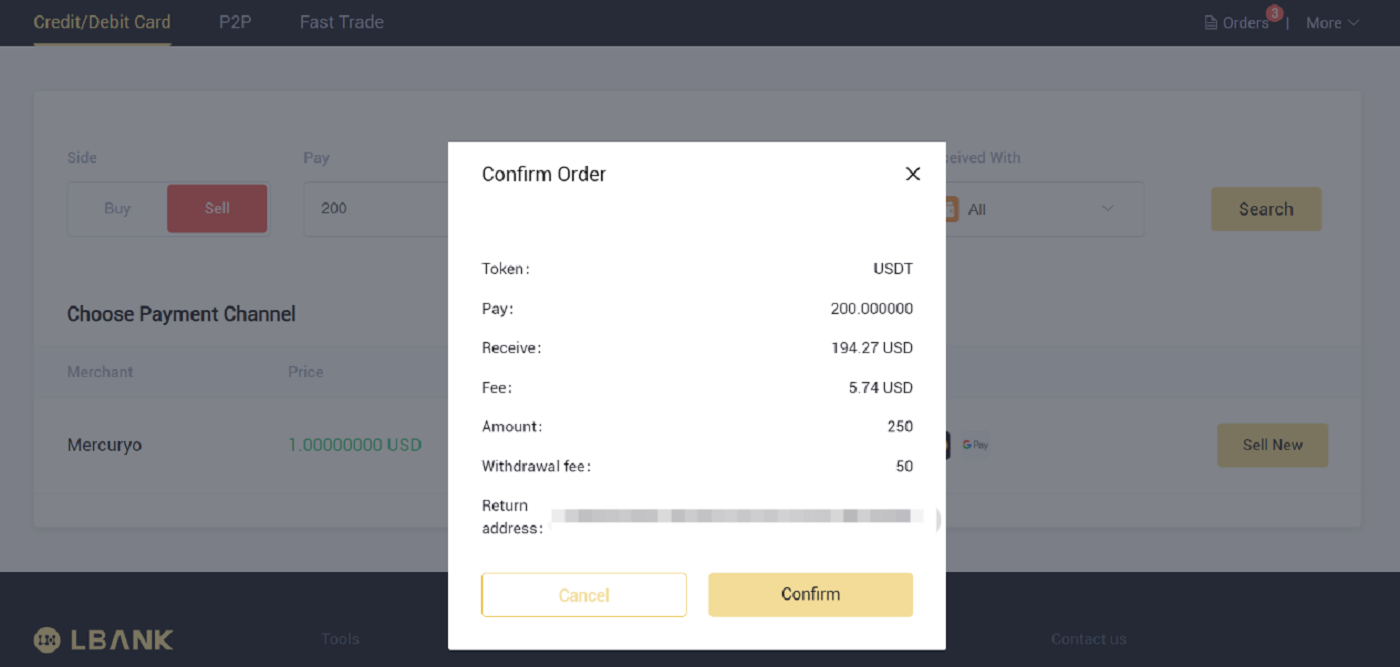
4. Verify the order, then click "Confirm". Follow the instructions on the checkout page to finish the payment.
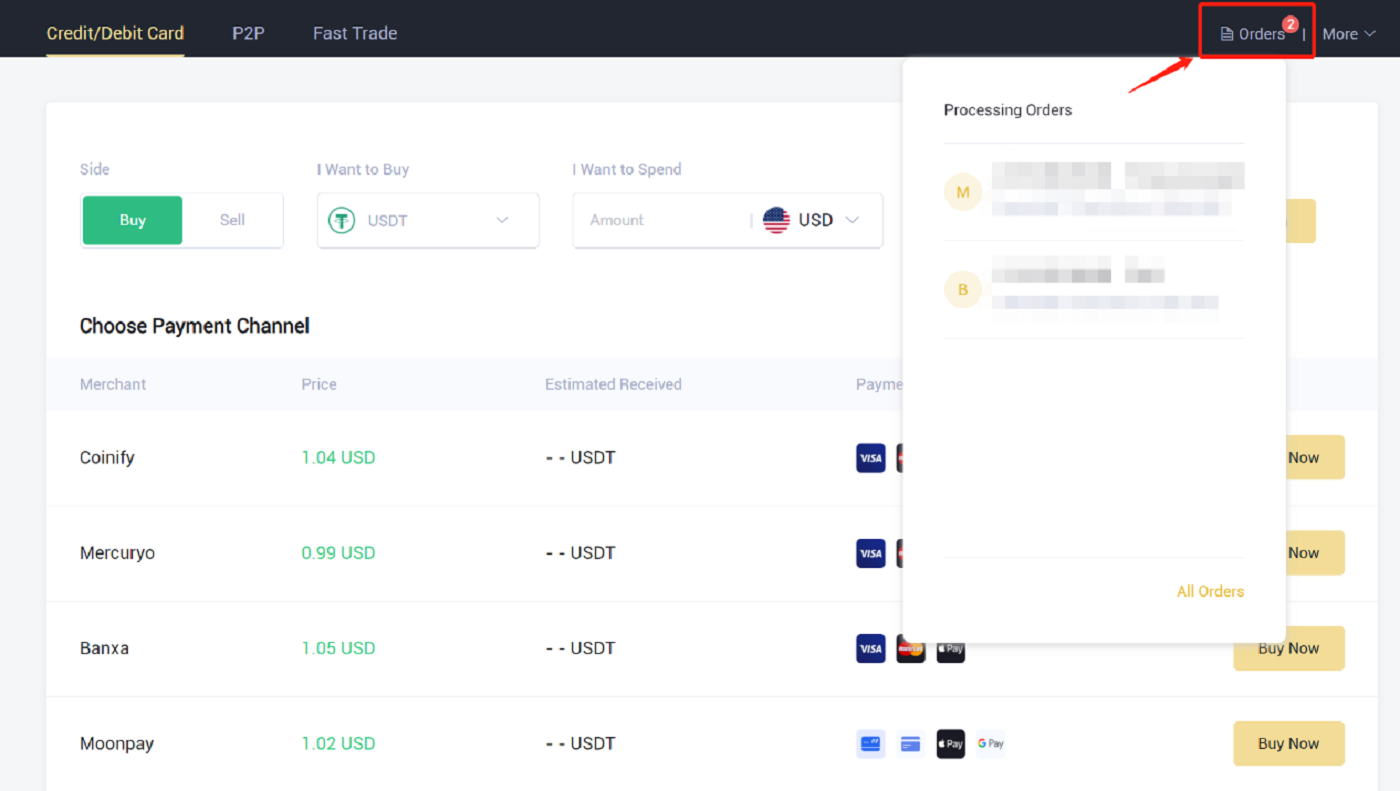
5. This is where you can see the order details.
Frequently Asked Questions
How to Resume Withdrawal Function?
For security purposes, the withdrawal function may be temporarily suspended for the following reasons:- The withdrawal function will be suspended for 24 hours after you have changed the password or disabled the SMS/Google authentication after logging in.
- The withdrawal function will be suspended for 48 hours after you have reset your SMS/Google authentication, unlock your account, or change your account email.
The withdrawal function will be resumed automatically when the time is up.
If your account has abnormal activities, the withdrawal function will also be temporarily disabled. Please contact our online service.
What Can I Do When I Withdraw to The Wrong Address?
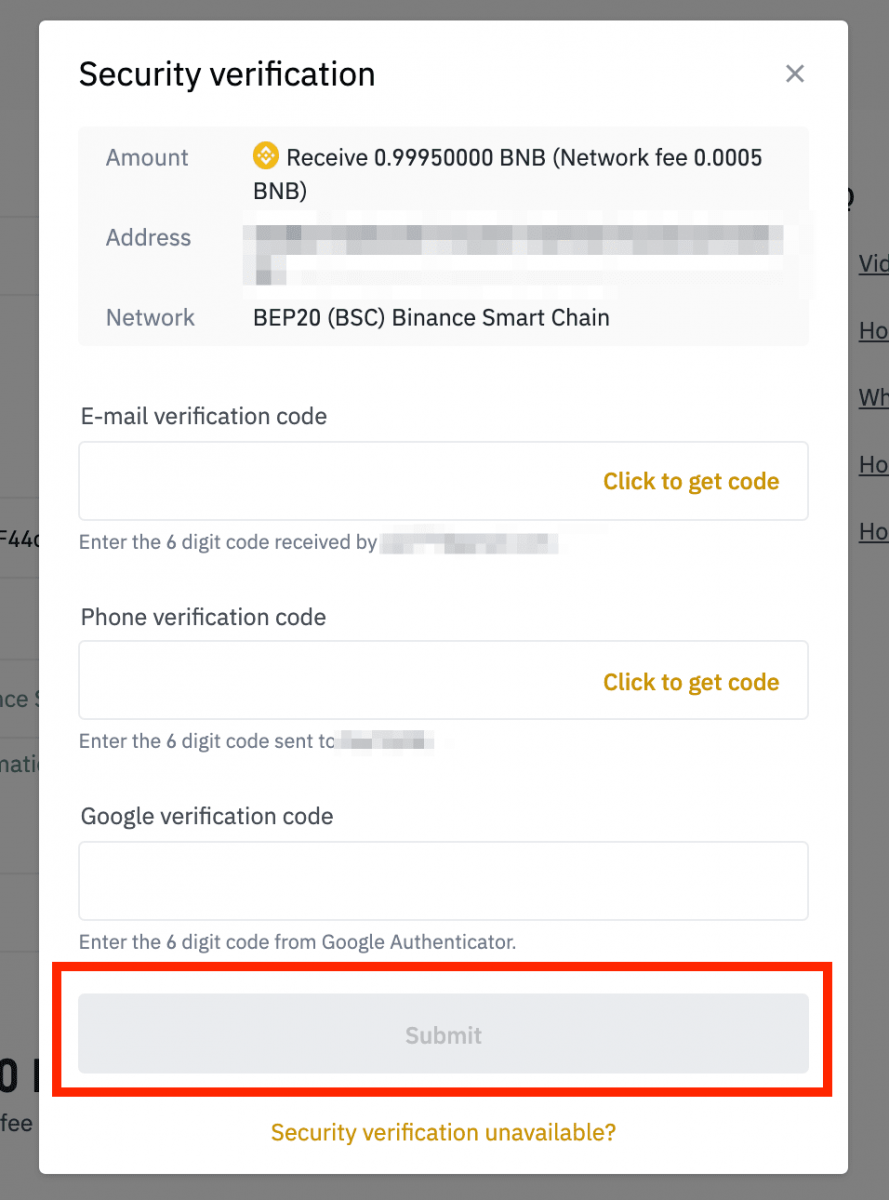
If you mistakenly withdraw funds to the wrong address, LBank is unable to locate the receiver of your funds and provide you with any further assistance. As our system initiates the withdrawal process as soon as you click [Submit] after completing security verification.
How can I retrieve the funds withdrawn to the wrong address?
- If you sent your assets to an incorrect address by mistake and you know the owner of this address, please contact the owner directly.
- If your assets were sent to the wrong address on another platform, please contact the customer support of that platform for assistance.
- If you forgot to write a Tag/Memo for withdrawal, please contact the customer support of that platform and provide them with the TxID of your withdrawal.
Why Hasn’t My Withdrawal Arrived?
1. I’ve made a withdrawal from LBank to another exchange/wallet, but I haven’t received my funds yet. Why?Transferring funds from your bank account to another exchange or wallet involves three steps:
- Withdrawal request on LBank
- Blockchain network confirmation
- Deposit on the corresponding platform
Normally, a TxID (Transaction ID) will be generated within 30-60 minutes, indicating that LBank has successfully broadcasted the withdrawal transaction.
However, it might still take some time for that particular transaction to be confirmed and even longer for the funds to be finally credited into the destination wallet. The amount of required “network confirmations” varies for different blockchains.
For example:
- A decides to withdraw 2 BTC from LBank to her personal wallet. After she confirms the request, she needs to wait until LBank creates and broadcasts the transaction.
- As soon as the transaction is created, A will be able to see the TxID (Transaction ID) on her LBank wallet page. At this point, the transaction will be pending (unconfirmed) and the 2 BTC will be frozen temporarily.
- If all goes well, the transaction will be confirmed by the network, and A will receive the BTC in her personal wallet after 2 network confirmations.
- In this example, she had to wait for 2 network confirmations until the deposit showed up in her wallet, but the required amount of confirmations varies depending on the wallet or exchange.
Note:
- If the blockchain explorer shows that the transaction is unconfirmed, please wait for the confirmation process to be completed. This varies depending on the blockchain network.
- If the blockchain explorer shows that the transaction is already confirmed, it means that your funds have been sent out successfully and we are unable to provide any further assistance on this matter. You will need to contact the owner/support team of the destination address to seek further help.
- If the TxID has not been generated 6 hours after clicking the confirmation button from the e-mail message, please contact our Customer Support for assistance and attach the withdrawal history screenshot of the relevant transaction. Please make sure you have provided the above-detailed information so the Customer Service agent can assist you promptly.
2. How do I check the transaction status on the blockchain?
Log in to your LBank account and click [Wallet] - [Spot] - [Transaction History] to view your cryptocurrency withdrawal record.

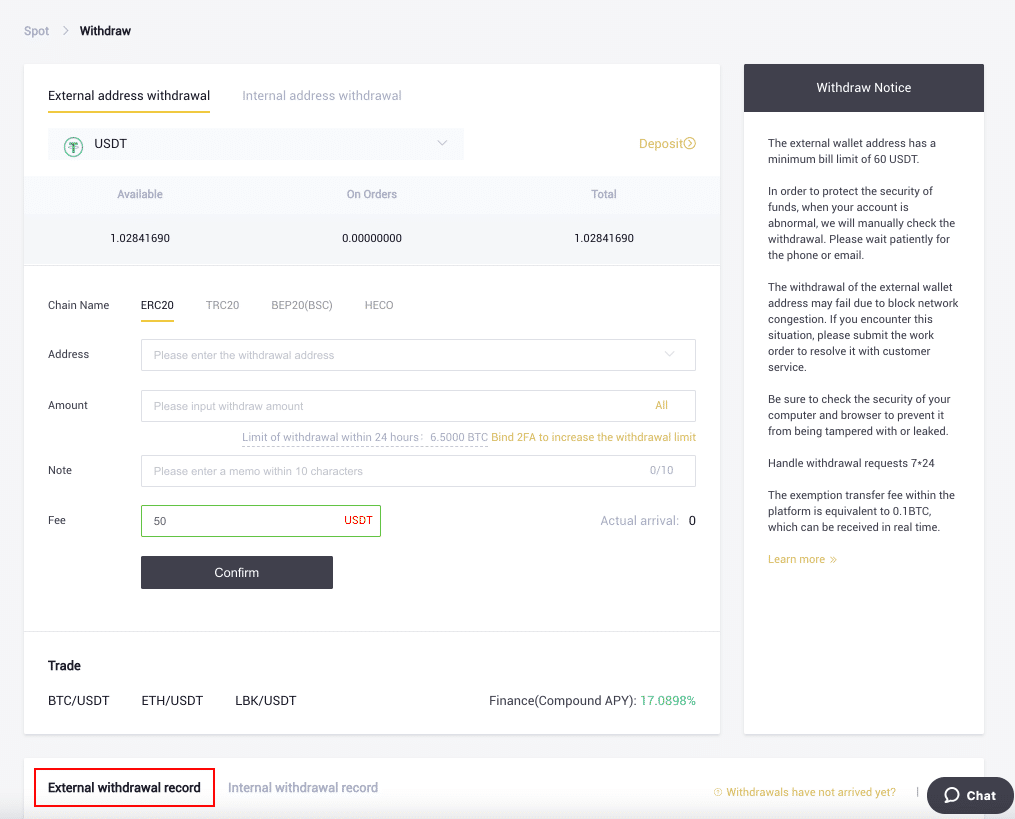
If the [Status] shows that the transaction is “Processing”, please wait for the confirmation process to be completed.
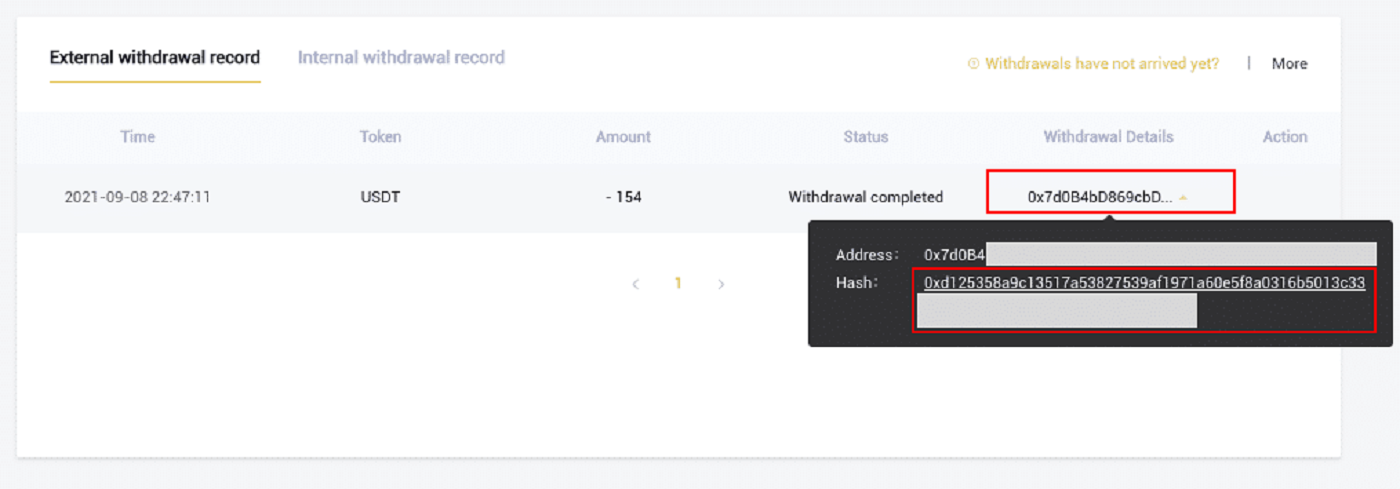
If the [Status] indicates that the transaction is "Completed," you can view the transaction details by clicking on the.

